Debugging Authentication
You have followed one of our authentication guides but something is not working. You have double checked that you followed all the steps, and that you used the correct secrets, but you are still stuck.
Frequently encountered issues
ctx.auth.getUserIdentity() returns null in a query
This often happens when subscribing to queries via useQuery in React, without
waiting for the client to be authenticated. Even if the user has been logged-in
previously, it takes some time for the client to authenticate with the Convex
backend. Therefore on page load, ctx.auth.getUserIdentity() called within a
query returns null.
To handle this, you can either:
- Use the
Authenticatedcomponent fromconvex/reactto wrap the component that includes theuseQuerycall (see the last two steps in the Clerk guide) - Or return
nullor some other "sentinel" value from the query and handle it on the client
If you are using fetchQuery for
Next.js Server Rendering, make
sure you are explicitly passing in a JWT token as documented
here.
If this hasn't helped, follow the steps below to resolve your issue.
Step 1: Check whether authentication works on the backend
- Add the following code to the beginning of your function (query, mutation, action or http action):
console.log("server identity", await ctx.auth.getUserIdentity());
-
Then call this function from whichever client you're using to talk to Convex.
-
Open the logs page on your dashboard.
-
What do you see on the logs page?
Answer: I don't see anything:
- Potential cause: You don't have the right dashboard open. Confirm that the Deployment URL on Settings > URL and Deploy Key page matches how your client is configured.
- Potential cause: Your client is not connected to Convex. Check your client logs (browser logs) for errors. Reload the page / restart the client.
- Potential cause: The code has not been pushed. For dev deployments make
sure you have
npx convex devrunning. For prod deployments make sure you successfully pushed vianpx convex deploy. Go to the Functions page on the dashboard and check that the code shown there includes theconsole.logline you added.
When you resolved the cause you should see the log appear.
Answer: I see a log with
'server identity' null:- Potential cause: The client is not supplying an auth token.
- Potential cause: Your deployment is misconfigured.
- Potential cause: Your client is misconfigured.
Proceed to step 2.
Answer: I see a log with
'server identity' { tokenIdentifier: '... }Great, you are all set!
Step 2: Check whether authentication works on the frontend
No matter which client you use, it must pass a JWT token to your backend for authentication to work.
The most bullet-proof way of ensuring your client is passing the token to the backend, is to inspect the traffic between them.
-
If you're using a client from the web browser, open the Network tab in your browser's developer tools.
-
Check the token
-
For Websocket-based clients (
ConvexReactClientandConvexClient), filter for thesyncname and selectWSas the type of traffic. Check thesyncitems. After the client is initialized (commonly after loading the page), it will send a message (check the Messages tab) withtype: "Authenticate", andvaluewill be the authentication token.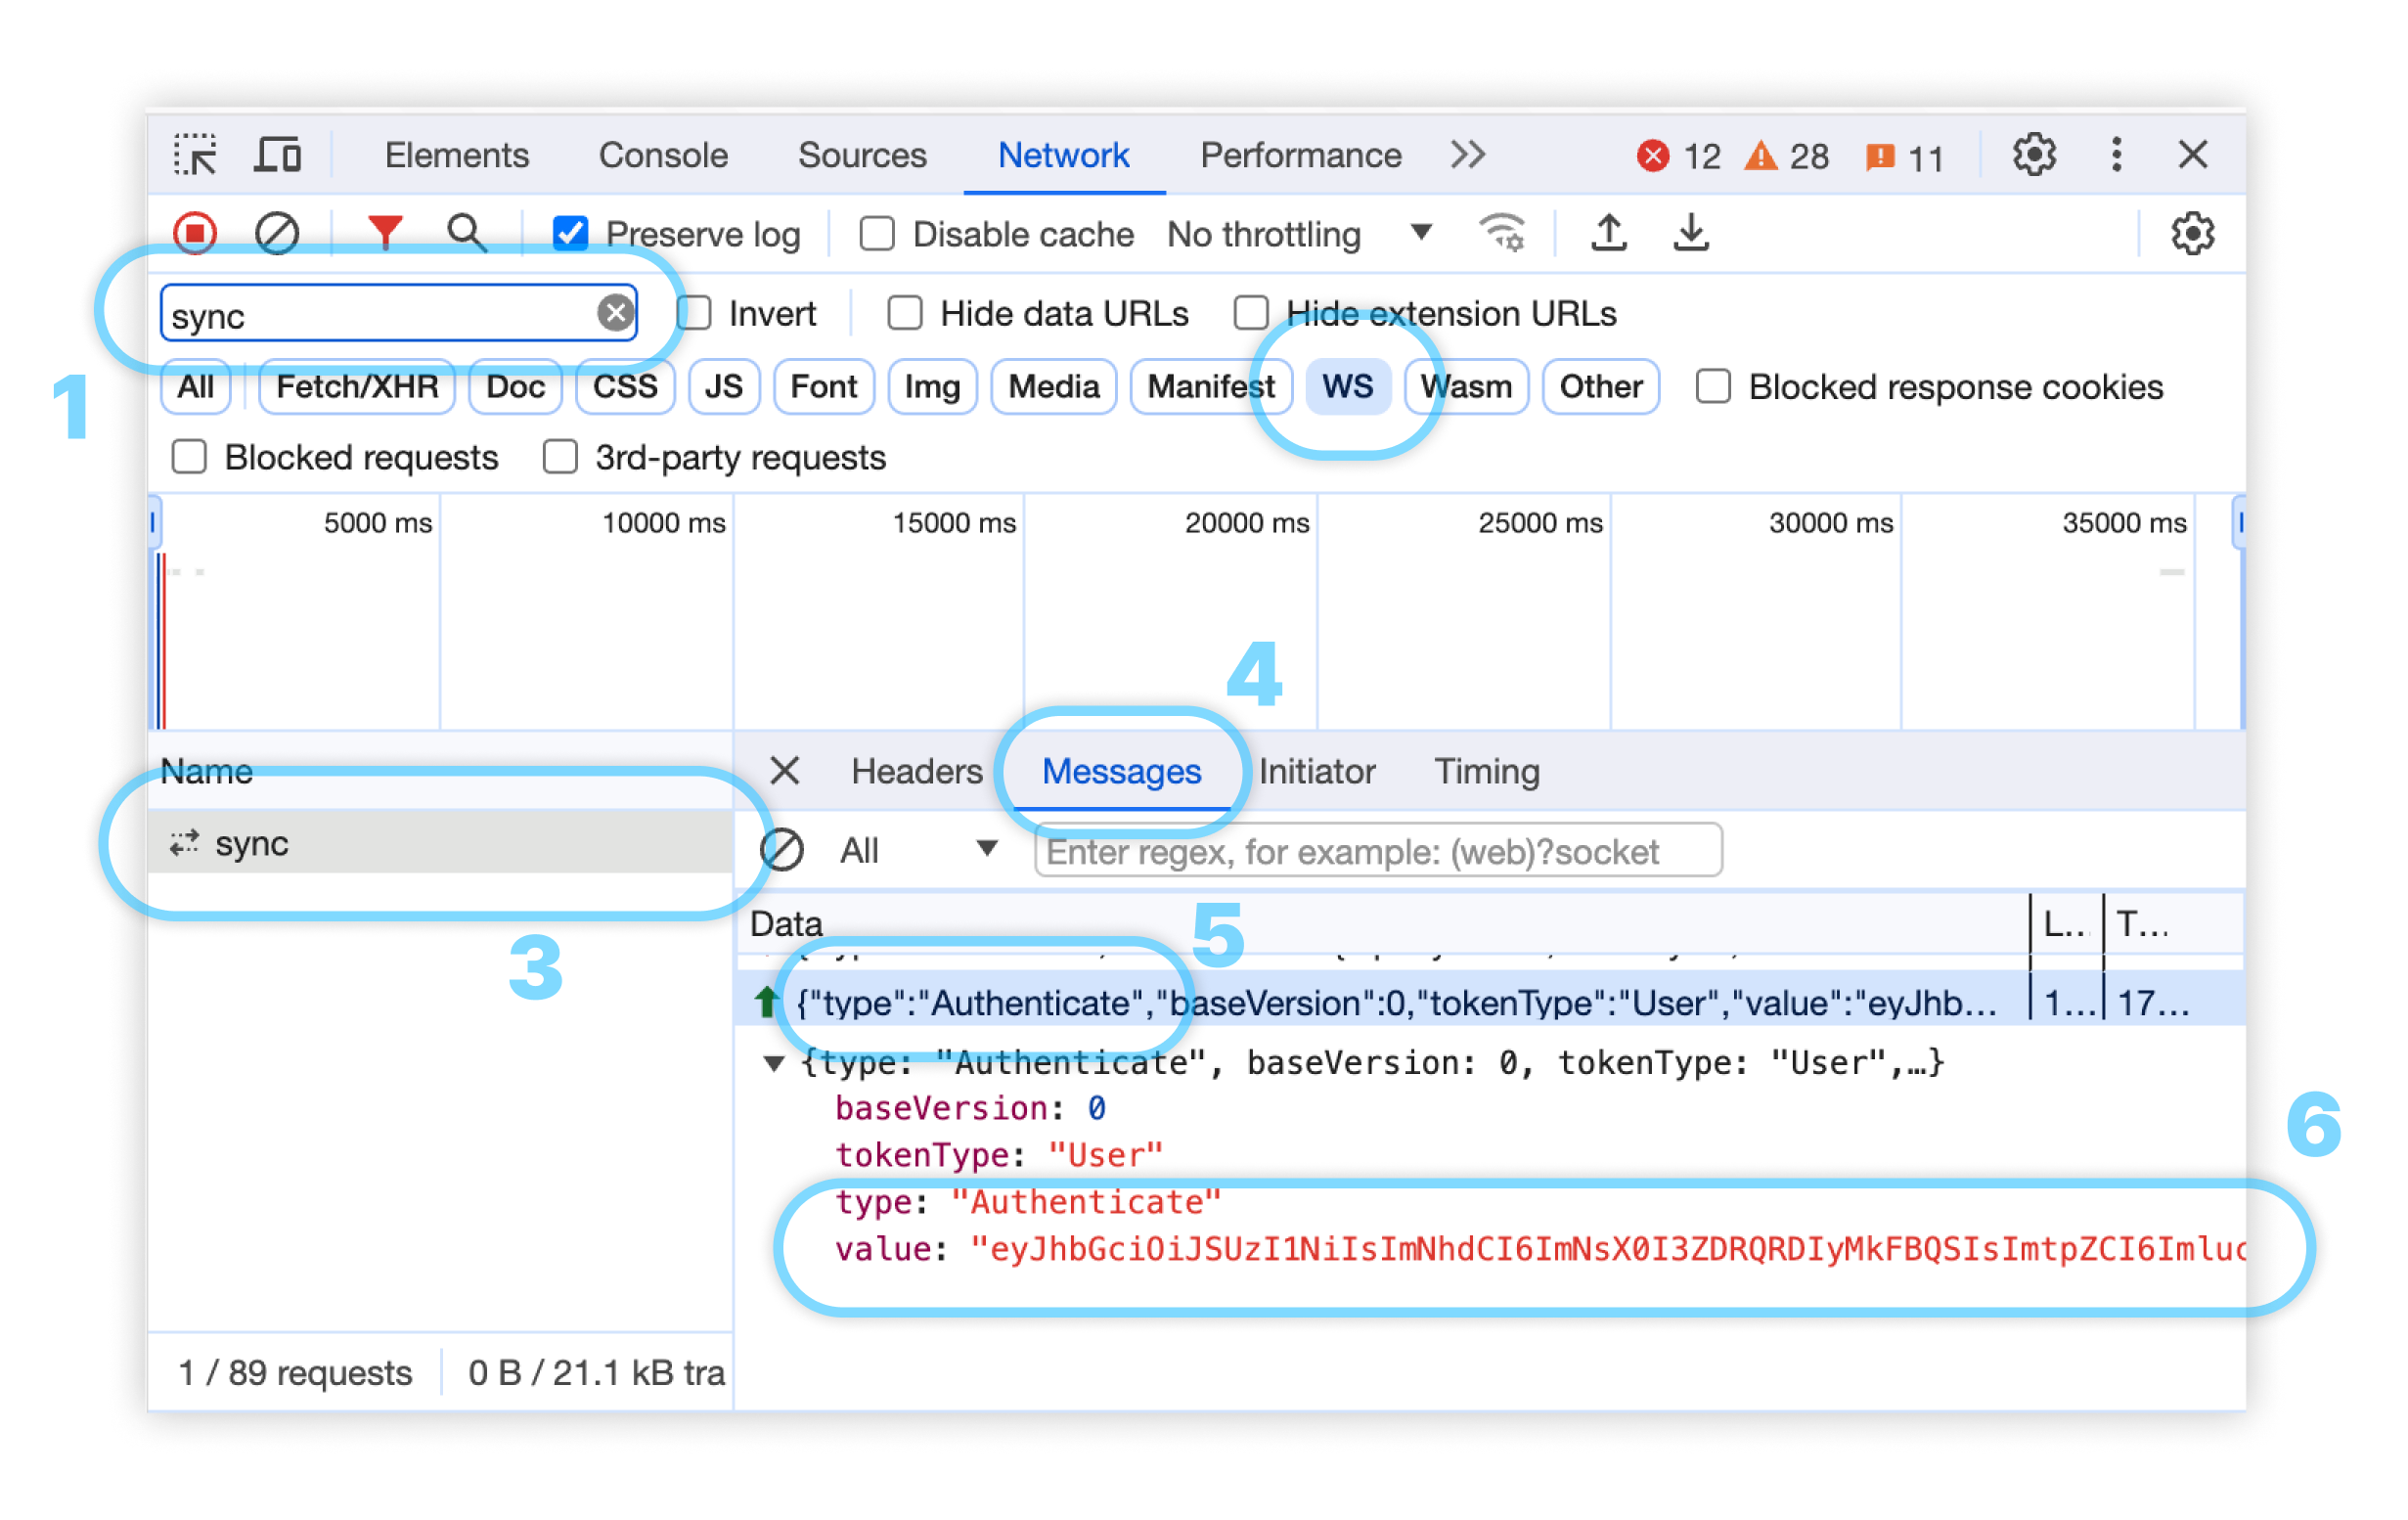
-
For HTTP based clients (
ConvexHTTPClientand the HTTP API), selectFetch/XHRas the type of traffic. You should see an individual network request for each function call, with anAuthorizationheader with valueBearerfollowed by the authentication token.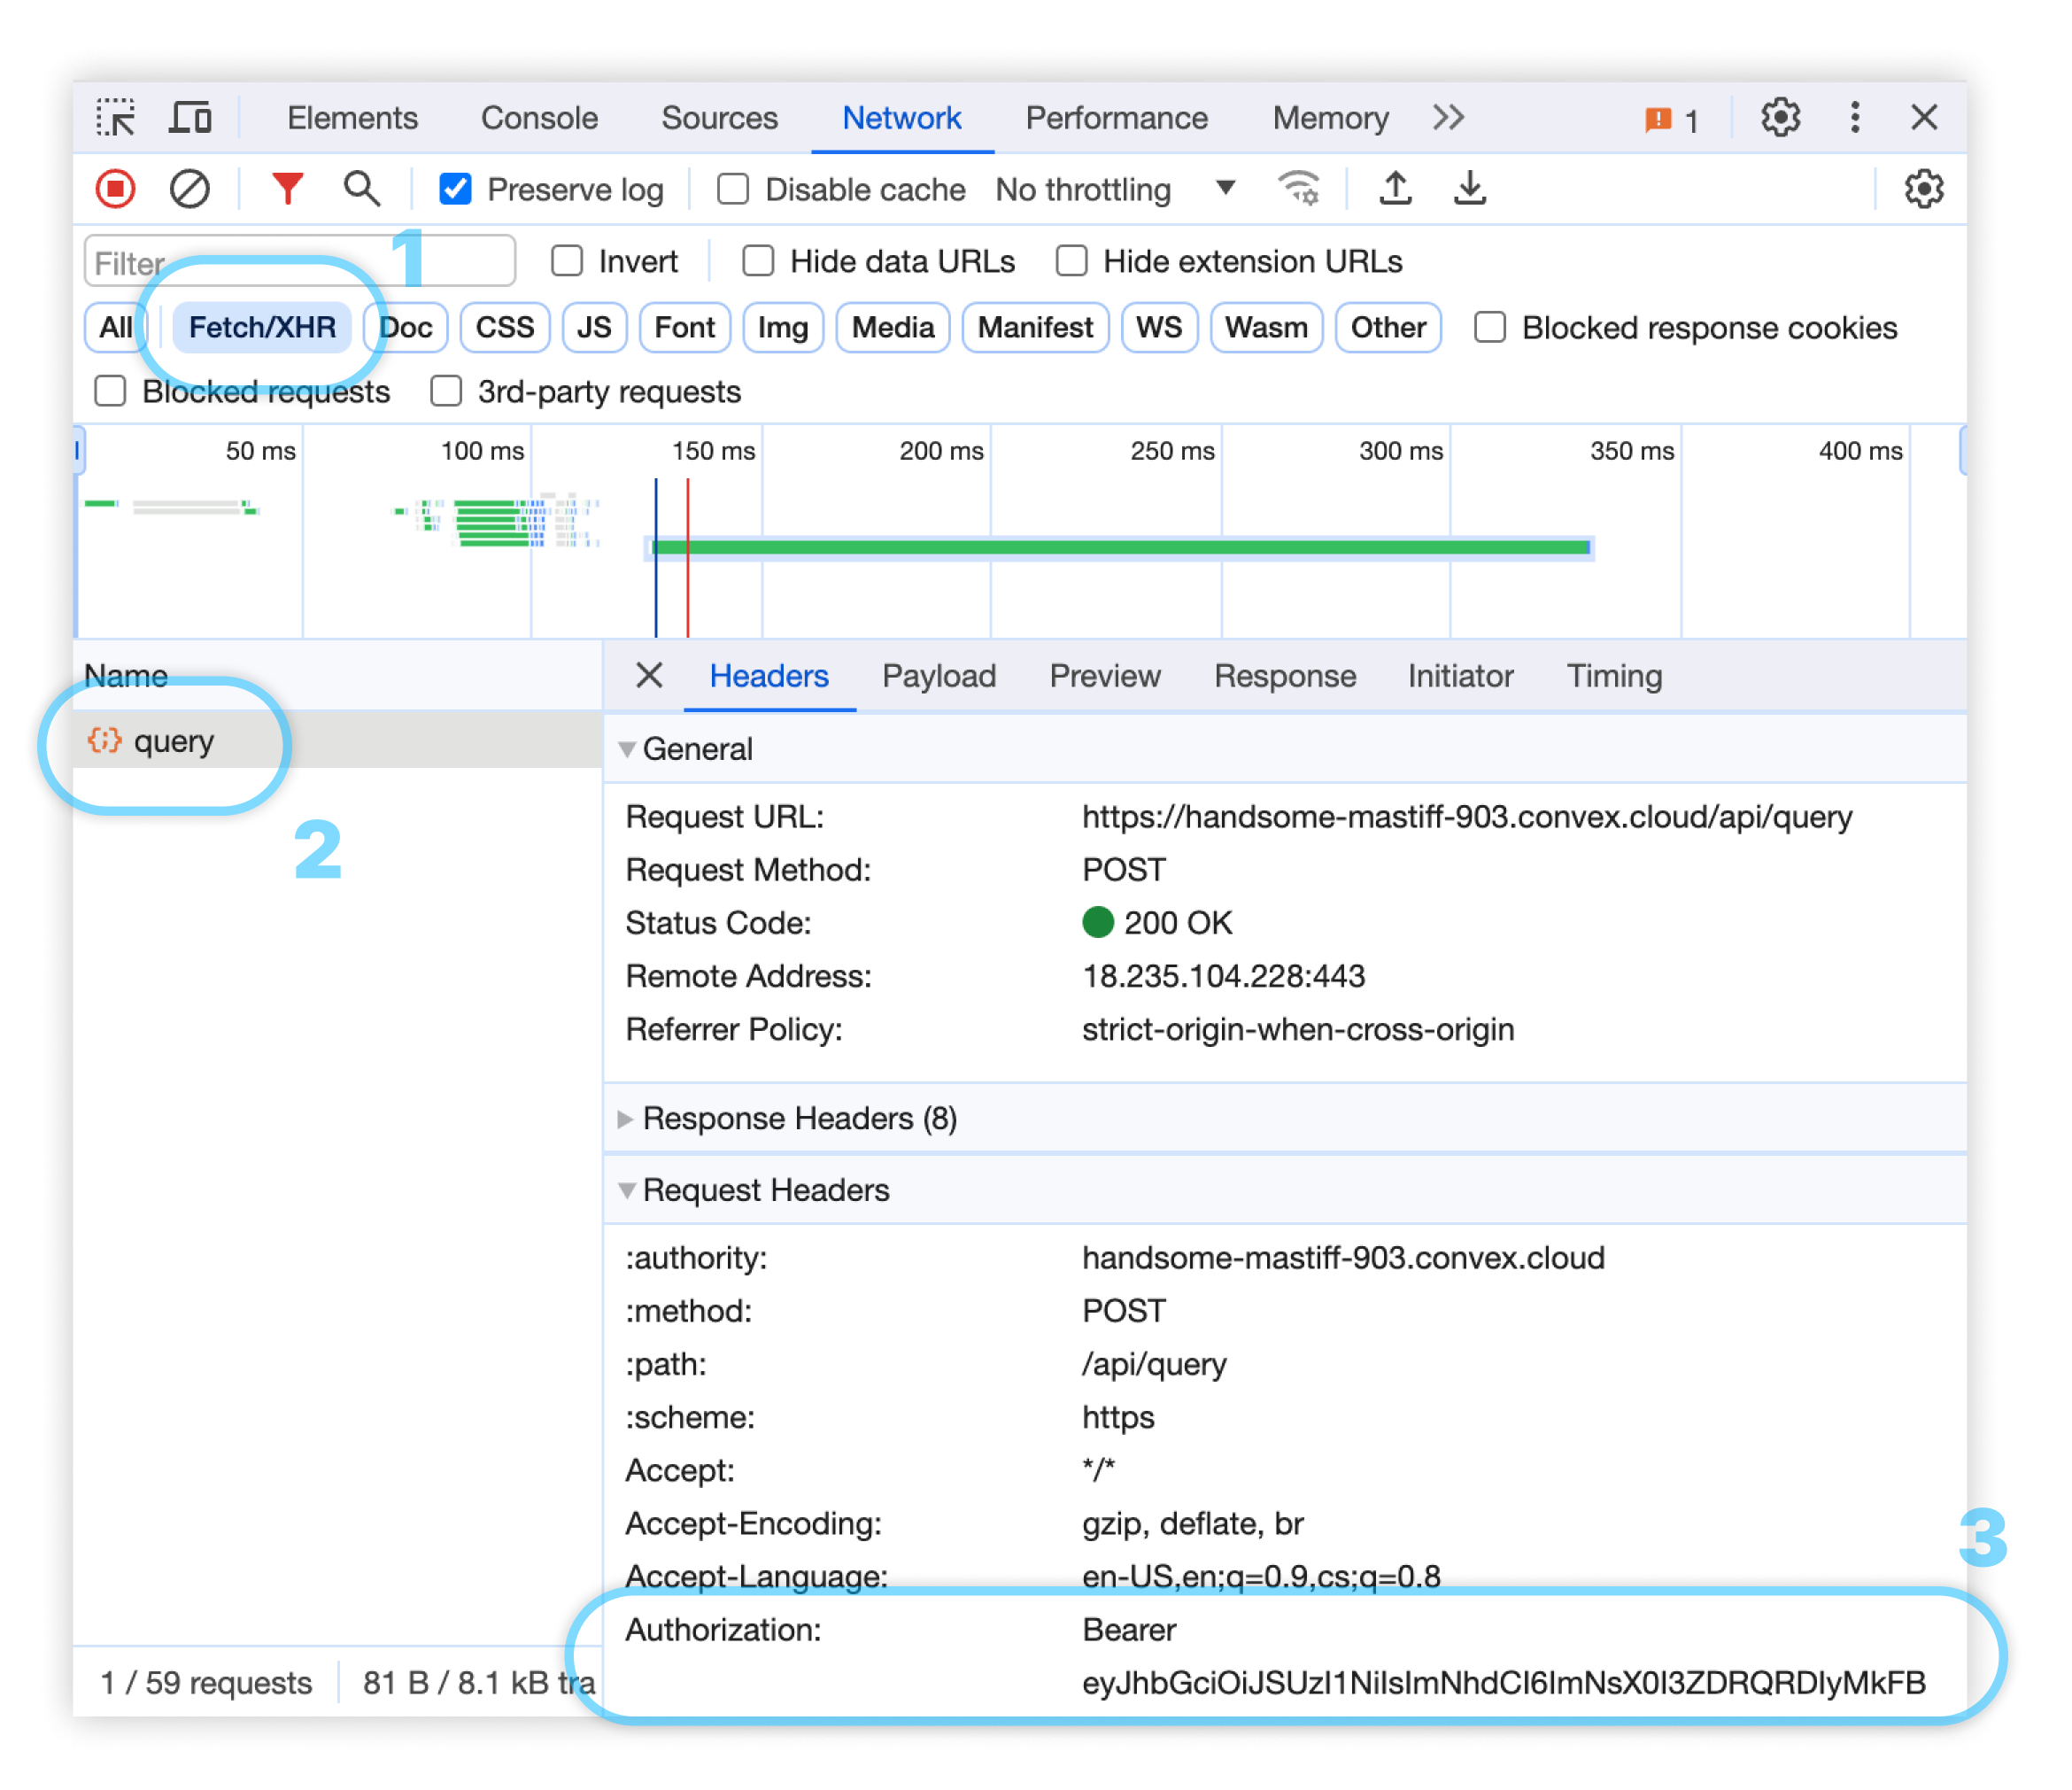
-
-
Do you see the authentication token in the traffic?
Answer: No:
-
Potential cause: The Convex client is not configured to get/fetch a JWT token. You're not using
ConvexProviderWithClerk/ConvexProviderWithAuth0/ConvexProviderWithAuthwith theConvexReactClientor you forgot to callsetAuthonConvexHTTPClientorConvexClient. -
Potential cause: You are not signed in, so the token is
nullorundefinedand theConvexReactClientskipped authentication altogether. Verify that you are signed in viaconsole.loging the token from whichever auth provider you are using:-
Clerk:
// import { useAuth } from "@clerk/nextjs"; // for Next.jsimport { useAuth } from "@clerk/react";const { getToken } = useAuth();console.log(getToken()); -
Auth0:
import { useAuth0 } from "@auth0/auth0-react";const { getAccessTokenSilently } = useAuth0();const response = await getAccessTokenSilently({detailedResponse: true,});const token = response.id_token;console.log(token); -
Custom: However you implemented
useAuthFromProviderX
If you don't see a long string that looks like a token, check the browser logs for errors from your auth provider. If there are none, check the Network tab to see whether requests to your provider are failing. Perhaps the auth provider is misconfigured. Double check the auth provider configuration (in the corresponding React provider or however your auth provider is configured for the client). Try clearing your cookies in the browser (in dev tools Application > Cookies > Clear all cookies button).
-
Answer: Yes, I see a long string that looks like a JWT:
Great, copy the whole token (there can be
.s in it, so make sure you're not copying just a portion of it). -
-
Open https://jwt.io/, scroll down and paste the token in the Encoded textarea on the left of the page. On the right you should see:
- In HEADER,
"typ": "JWT" - in PAYLOAD, a valid JSON with at least
"aud","iss"and"sub"fields. If you see gibberish in the payload you probably didn't copy the token correctly or it's not a valid JWT token.
If you see a valid JWT token, repeat step 1. If you still don't see correct identity, proceed to step 3.
- In HEADER,
Step 3: Check that backend configuration matches frontend configuration
You have a valid JWT token on the frontend, and you know that it is being passed to the backend, but the backend is not validating it.
-
Open the Settings > Authentication on your dashboard. What do you see?
Answer: I see
This deployment has no configured authentication providers:- Cause: You do not have an
auth.config.tsfile in yourconvexdirectory, or you haven't pushed your code. Follow the authentication guide to create a valid auth config file. For dev deployments make sure you havenpx convex devrunning. For prod deployments make sure you successfully pushed vianpx convex deploy.
**Answer: I see one or more Domain and Application ID pairs.
- Cause: You do not have an
Great, let's check they match the JWT token.
-
Look at the
issfield in the JWT token payload at https://jwt.io/. Does it match a Domain on the Authentication page?Answer: No, I don't see the
issURL on the Convex dashboard:-
Potential cause: You copied the wrong value into your
auth.config.ts'sdomain, or into the environment variable that is used there. Go back to the authentication guide and make sure you have the right URL from your auth provider. -
Potential cause: Your client is misconfigured:
-
Clerk: You have the wrong
publishableKeyconfigured. The key must belong to the Clerk instance that you used to configure yourauth.config.ts.- Also make sure that the JWT token in Clerk is called
convex, as that's the nameConvexProviderWithClerkuses to fetch the token!
- Also make sure that the JWT token in Clerk is called
-
Auth0: You have the wrong
domainconfigured (on the client!). The domain must belong to the Auth0 instance that you used to configure yourauth.config.ts. -
Custom: Make sure that your client is correctly configured to match your
auth.config.ts.
-
Answer: Yes, I do see the
issURL:Great, let's move one.
-
-
Look at the
audfield in the JWT token payload at https://jwt.io/. Does it match the Application ID under the correct Domain on the Authentication page?Answer: No, I don't see the
audvalue in the Application ID field:- Potential cause: You copied the wrong value into your
auth.config.ts'sapplicationID, or into the environment variable that is used there. Go back to the authentication guide and make sure you have the right value from your auth provider. - Potential cause: Your client is misconfigured:
- Clerk: You have the wrong
publishableKeyconfigured.The key must belong to the Clerk instance that you used to configure yourauth.config.ts. - Auth0: You have the wrong
clientIdconfigured. Make sure you're using the rightclientIdfor the Auth0 instance that you used to configure yourauth.config.ts. - Custom: Make sure that your client is correctly configured to match your
auth.config.ts.
- Clerk: You have the wrong
Answer: Yes, I do see the
audvalue in the Application ID field:Great, repeat step 1 and you should be all set!
- Potential cause: You copied the wrong value into your