iOS & macOS Swift
The Convex Swift client library enables your iOS or macOS application to interact with your Convex backend. It allows your frontend code to:
The library is open source and available on GitHub.
Follow the Swift Quickstart to get started.
Installation
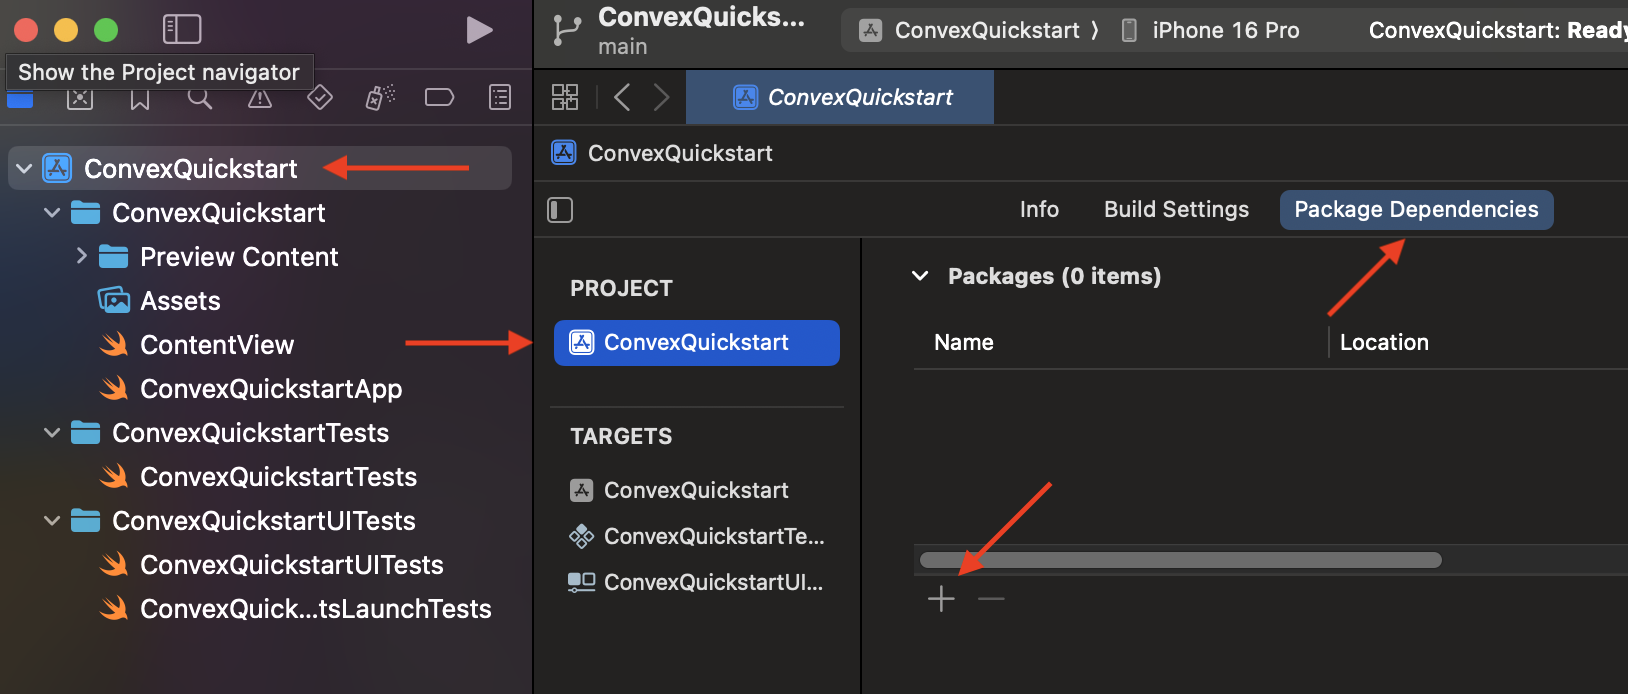
For an iOS or macOS project in Xcode, you’ll need to perform the following steps
to add a dependency on the ConvexMobile library.
-
Click on the top-level app container in the project navigator on the left
-
Click on the app name under the PROJECT heading
-
Click the Package Dependencies tab
-
Click the + button
-
Paste
https://github.com/get-convex/convex-swiftinto the search box and press Enter -
When the
convex-swiftpackage loads, click the Add Package button -
In the Package Products dialog, select your product name in the Add to Target dropdown
-
Click Add Package
The latest release and release history is available on GitHub.
Connecting to a backend
The ConvexClient is used to establish and maintain a connection between your
application and the Convex backend. First you need to create an instance of the
client by giving it your backend deployment URL:
import ConvexMobile

let convex = ConvexClient(deploymentUrl: "https://<your domain here>.convex.cloud")
You should create and use one instance of the ConvexClient for the lifetime of
your application process. You can store the client in a global constant like
shown above. An actual connection to the Convex backend won’t be initiated until
you call a method on the ConvexClient. After that it will maintain the
connection and re-establish it if it gets dropped.
Fetching data
The Swift Convex library gives you access to the Convex sync engine, which
enables real-time subscriptions to query results. You subscribe to queries
with the subscribe method on ConvexClient which returns
a Publisher. The data
available via the Publisher will change over time as the underlying data
backing the query changes.
You can call methods on the Publisher to transform and consume the data it
provides.
A simple way to consume a query that returns a list of strings in a View is to
use a combination of a @State containing a list and the .task modifier with
code that loops over the query results as an AsyncSequence:
struct ColorList: View {
  @State private var colors: [String] = []

  var body: some View {
    List {
      ForEach(colors, id: \.self) { color in
        Text(color)
      }
    }.task {
      let latestColors = convex.subscribe(to: "colors:get", yielding: [String].self)
        .replaceError(with: [])
        .values
      for await colors in latestColors {
        self.colors = colors
      }
    }
  }
}
Any time the data that powers the backend "colors:get" query changes, a
new array of String values will appear in the AsyncSequence and the
View's colors list gets assigned the new data. The UI will then rebuild
reactively to reflect the changed data.
Query arguments
You can pass arguments to subscribe and they will be supplied to the
associated backend query function. The arguments must be a Dictionary keyed
with strings and the values should generally be primitive types, Arrays and
other Dictionaries.
let publisher = convex.subscribe(to: "colors:get",
                               with:["onlyFavorites": true],
                           yielding:[String].self)
Assuming the colors:get query accepts an onlyFavorites argument, the value
can be received and used to perform logic in the query function.
Use Decodable structs to automatically convert Convex objects to Swift structs.
- There are important gotchas when sending and receiving numbers between Swift and Convex. * Depending on your backend functions, you may need to deal with reserved Swift keywords.
Subscription lifetime
The Publisher returned from subscribe will persist as long as the associated
View or ObservableObject. When either is no longer part of the UI, the
underlying query subscription to Convex will be canceled.
Editing Data
You can use the mutation method on ConvexClient to trigger a
backend mutation.
mutation is an async method so you'll need to call it within a Task.
Mutations can return a value or not.
Mutations can also receive arguments, just like queries. Here's an example of calling a mutation with arguments that returns a value:
let isColorAdded: Bool = try await convex.mutation("colors:put", with: ["color": newColor])
Handling errors
If an error occurs during a call to mutation, it will throw. Typically you may
want to
catch ConvexError and ServerError and
handle them however is appropriate in your application.
Here’s a small example of how you might handle an error from colors:put if it
threw a ConvexError with an error message if a color already existed.
do {
  try await convex.mutation("colors:put", with: ["color": newColor])
} catch ClientError.ConvexError(let data) {
  errorMessage = try! JSONDecoder().decode(String.self, from: Data(data.utf8))
  colorNotAdded = true
}
See documentation on error handling for more details.
Calling third-party APIs
You can use the action method on ConvexClient to trigger a
backend action.
Calls to action can accept arguments, return values and throw exceptions just
like calls to mutation.
Even though you can call actions from your client code, it's not always the right choice. See the action docs for tips on calling actions from clients.
Authentication
You can use ConvexClientWithAuth in place of ConvexClient to use an
authentication provider. You'll need to choose an existing AuthProvider
implementation or possibly create your own. See the AuthProvider options below
and consult the overall Convex authentication docs as
needed.
Auth0
To use Auth0, you'll need to add a dependency on
the convex-swift-auth0 library as well as have an Auth0 account and
application configuration.
See
the README in
the convex-swift-auth0 repo for more detailed setup instructions, and
the Workout example app which
is configured for Auth0.
Clerk
To use Clerk, you'll need to add a dependency on the clerk-convex-swift
library as well as have a Clerk account and application configured to use
Convex.
See the
README in the
clerk-convex-swift repo for detailed setup instructions. Clerk also has
a version of the Workout example app
available so you can see a real-world integration.
Custom auth providers
It should also be possible to integrate other similar OpenID Connect
authentication providers. See
the AuthProvider protocol
in the convex-swift repo for more info.
Production and dev deployments
When you're ready to move toward production for your app, you can setup your Xcode build system to point different build targets to different Convex deployments. Build environment configuration is highly specialized, and it’s possible that you or your team have different conventions, but this is one way to approach the problem.
- Create “Dev” and “Prod” folders in your project sources.
- Add an
Env.swiftfile in each one with contents like:
let deploymentUrl = "https://$DEV_OR_PROD.convex.cloud"
- Put your dev URL in
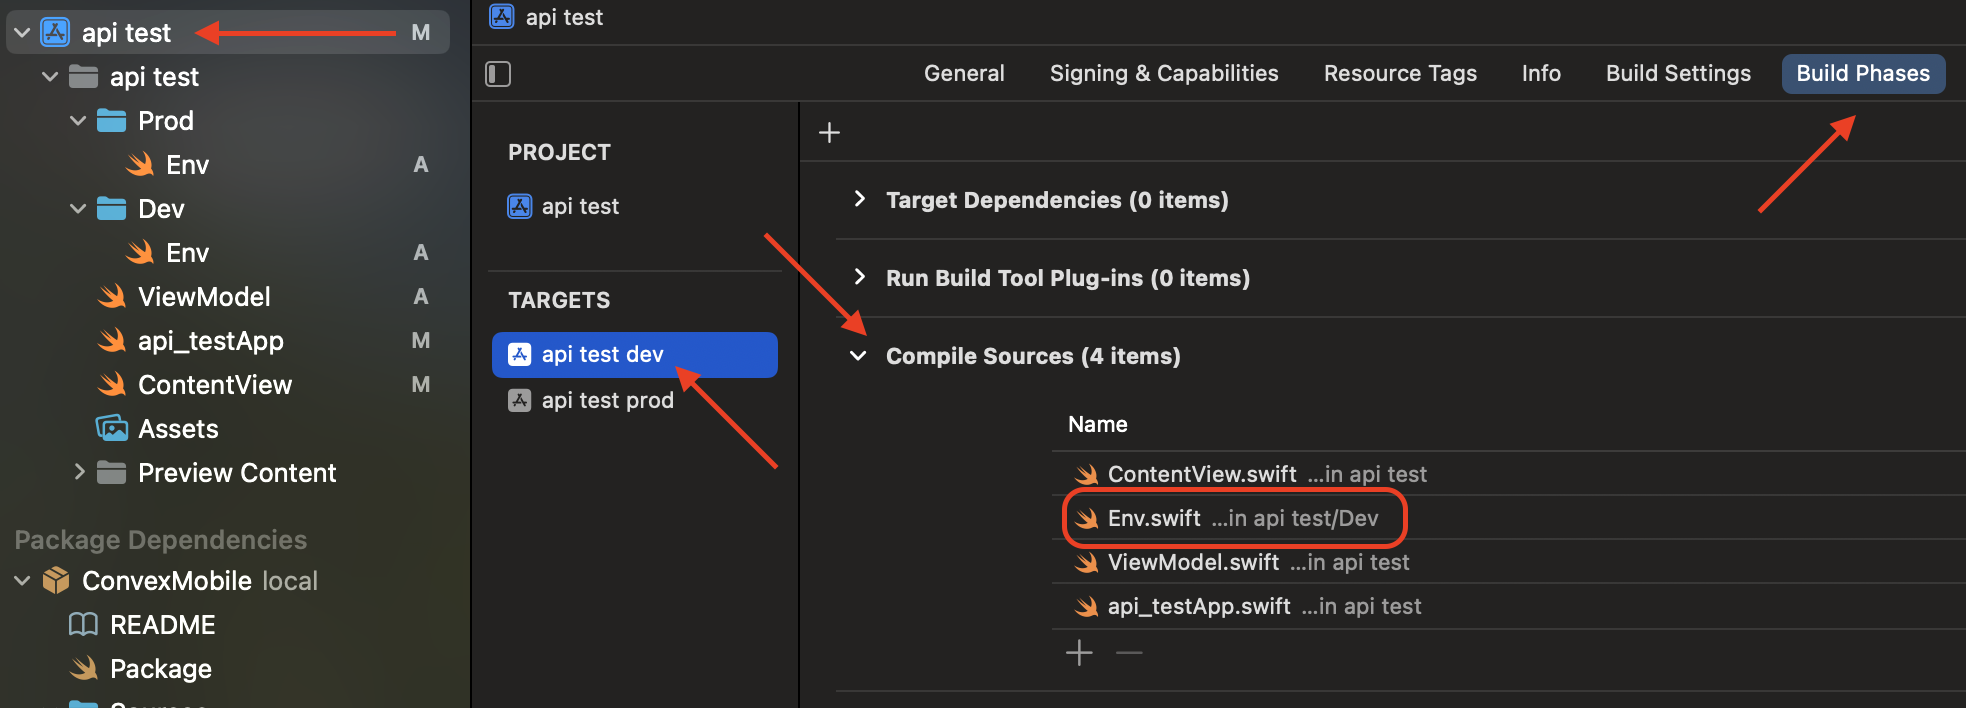
Dev/Env.swiftand your prod URL inProd/Env.swift. Don’t worry if Xcode complains thatdeploymentUrlis defined multiple times. - Click on your top-level project in the explorer view on the left.
- Select your build target from the TARGETS list.
- Change the target’s name so it ends in “dev”.
- Right/Ctrl-click it and duplicate it, giving it a name that ends in “prod”.
- With the “dev” target selected, click the Build Phases tab.
- Expand the Compile Sources section.
- Select
Prod/Env.swiftand remove it with the - button. - Likewise, open the “prod” target and remove
Dev/Env.swiftfrom its sources.
Now you can refer to deploymentUrl wherever you create your ConvexClient and
depending on the target that you build, it will use your dev or prod URL.
Structuring your application
The examples shown in this guide are intended to be brief, and don't provide guidance on how to structure a whole application.
If you want a more robust and layered approach, put your code that interacts
with ConvexClientin a class that conforms to ObservableObject. Then your
View can observe that object as a @StateObject and will rebuild whenever it
changes.
For example, if we adapt the colors:get example from above to a
ViewModel: ObservableObject class, the View no longer plays a direct part in
fetching the data - it only knows that the list of colors is provided by the
ViewModel.
import SwiftUI

class ViewModel: ObservableObject {
  @Published var colors: [String] = []

  init() {
    convex.subscribe(to: "colors:get")
      .replaceError(with: [])
      .receive(on: DispatchQueue.main)
      .assign(to: &$colors)
  }
}

struct ContentView: View {
  @StateObject var viewModel = ViewModel()

  var body: some View {
    List {
      ForEach(viewModel.colors, id: \.self) { color in
        Text(color)
      }
    }
  }
}
Depending on your needs and the scale of your app, it might make sense to give it even more formal structure as demonstrated in something like https://github.com/nalexn/clean-architecture-swiftui.
Under the hood
The Swift Convex library is built on top of the official Convex Rust client. It handles maintaining a WebSocket connection with the Convex backend and implements the full Convex protocol.
All method calls on ConvexClient are handled via a Tokio async runtime on the
Rust side and are safe to call from the application's main actor.
Observing WebSocket state
You can call the watchWebSocketState() method on a client to get a Publisher
that will keep you up to date on the status of the Convex WebSocket connection.
The connection is either in .connected or .connecting state, as Convex
always tries to maintain a connection to the backend.
Available since version 0.7.0.
Debug logging
While developing your application, it can be useful to see the underlying state
of the Convex client. Calling the initConvexLogging() function in your
App.init method will cause Convex to output log messages to the OSLog where
they can easily be viewed in XCode.
The debug logs can contain sensitive data that your application sends to/from your Convex backend. Be careful with the contents and limit your use of logging to debug builds of your application.
Available since version 0.6.0.