Convex Tutorial: Calling external services
In the previous step, you built a fully self-contained chat app. Data in, data out.
In order to power the automatic reactivity we just saw while providing strong
database transactions, query and mutation functions in Convex are not allowed to
make fetch calls to the outside world.
Real apps aren't this simple. They often need to talk to the rest of the internet directly from the backend. Convex lets you do this too via action functions.
Action functions let the sync engine access the external world by scheduling out work that can then write data back via mutations.
Let's make our chat app a bit smarter by letting anyone in the chat get the Wikipedia summary of a topic using the Wikipedia API.
Your first action
Add the following action to your convex/chat.ts file.
// Update your server import like this:
import { query, mutation, internalAction } from "./_generated/server";

//...

export const getWikipediaSummary = internalAction({
  args: { topic: v.string() },
  handler: async (ctx, args) => {
    const response = await fetch(
      "https://en.wikipedia.org/w/api.php?format=json&action=query&prop=extracts&exintro&explaintext&redirects=1&titles=" +
        args.topic,
    );

    return getSummaryFromJSON(await response.json());
  },
});

function getSummaryFromJSON(data: any) {
  const firstPageId = Object.keys(data.query.pages)[0];
  return data.query.pages[firstPageId].extract;
}
Let's walk through it:
- First, we created a new Convex action function called
getWikipediaSummary. We usedinternalActionbecause we want this function to be private to the Convex backend and not exposed as a public API. This function does a simple fetch to the Wikipedia API with our topic. - Next, we have a helper TypeScript function called
getSummaryFromJSONto pull out the summary text from the JSON response. - The
getWikipediaSummaryfunction calls our helper function like any other TypeScript function.
This is great and all, but how do I use it?
To quickly test this function in the Convex dashboard, go to
https://dashboard.convex.dev
and navigate to your project. Click on the Functions in the left nav, and then
click on the getWikipediaSummary function. Click "Run Function".
The function runner UI will pop up. Try making a few searches.
Hooking it up to your app
It's awesome that we can call Wikipedia, but we still need to show up in our chat. So, let's hook it all up.
Update your existing sendMessage mutation like this:
// Import the api reference
import { api, internal } from "./_generated/api";

//...

export const sendMessage = mutation({
  args: {
    user: v.string(),
    body: v.string(),
  },
  handler: async (ctx, args) => {
    console.log("This TypeScript function is running on the server.");
    await ctx.db.insert("messages", {
      user: args.user,
      body: args.body,
    });

    // Add the following lines:
    if (args.body.startsWith("/wiki")) {
      // Get the string after the first space
      const topic = args.body.slice(args.body.indexOf(" ") + 1);
      await ctx.scheduler.runAfter(0, internal.chat.getWikipediaSummary, {
        topic,
      });
    }
  },
});
Wait a second! What's with this ctx.scheduler stuff? Convex comes with a
powerful durable function scheduler. It's a fundamental part of the sync engine,
and it's the way you coordinate asynchronous functions in Convex.
In the case of mutations, it's the only way to call an action to fetch from the outside world. The really cool part is, if for some reason your mutation throws an exception, then nothing is scheduled. This is because mutations are transactions, and scheduling is just a write in the database to tell Convex to run this function at a future time.
Ok so, we can schedule our action, but we still need to write the summary back to the chat.
Let's go back and update our getWikipediaSummary action:
export const getWikipediaSummary = internalAction({
  args: { topic: v.string() },
  handler: async (ctx, args) => {
    const response = await fetch(
      "https://en.wikipedia.org/w/api.php?format=json&action=query&prop=extracts&exintro&explaintext&redirects=1&titles=" +
        args.topic,
    );

    // Replace the `return ...` with the following.
    const summary = getSummaryFromJSON(await response.json());
    await ctx.scheduler.runAfter(0, api.chat.sendMessage, {
      user: "Wikipedia",
      body: summary,
    });
  },
});
Just like scheduling the action, we're now scheduling our sendMessage mutation
to send the result of our Wikipedia lookup to our chat.
Go ahead, now play with your app!
The scheduler, actions, and the sync engine
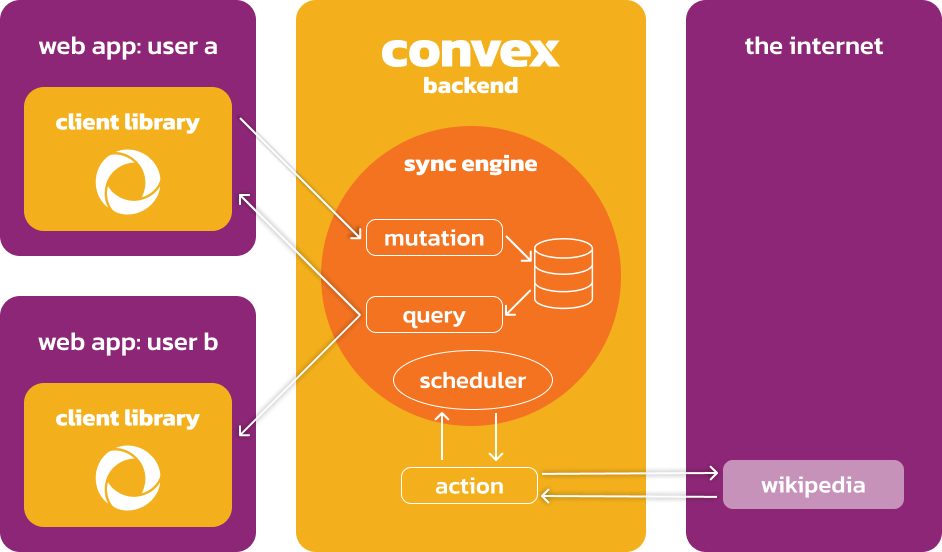
Queries and mutations are the only ways to interact with the database and the scheduler enables building sophisticated workflows with actions in between.
Actions are normal serverless functions like AWS Lambda and Google Cloud Run. They help model flows like calling AI APIs and using the Vector Store. They serve as an escape hatch. They deal with the reality of the messy outside world with few guarantees.
Actions are not part of the sync engine. To talk to the database they have to talk through query and mutation functions. This restriction lets Convex enforce transactional guarantees in the database and keep the sync engine fast and nimble.
The best way to structure your application for scale is to minimize the work
that happens in an action. Only the part that needs the
non-determinism, like
making the external fetch call should use them. Keeping them as small as
possible is the most scalable way to build Convex apps, enabling the highest
throughput.
The scheduler allows your app to keep most of its important logic in queries and mutations and structure your code as workflows in and out of actions.
What you built
In this section of the tutorial, you built an action to talk to the outside world and used the scheduler to trigger this work.
You learned that keeping our actions small and keeping most of our work in queries and mutations are fundamental to building scalable Convex backends.
Next up
You've now learned the most important concepts in Convex. As a full-featured backend, Convex is capable of many things such as authentication, file storage and search. You can add those features as needed by following the documentation.
We touched a little bit on setting your app up for success. As your application scales, you will run into new challenges. Let's learn how to deal with some of these challenges in the next section →.
Scaling your app
Learn how to scale your Convex application using indexes, handling write conflicts, and leveraging Convex Components for best practices.