Convex Tutorial: A chat app
Convex provides you with a fully featured backend with cloud functions, database, scheduling, and a sync engine that keeps your frontend and backend up to date in real-time.
Today, in about 10 lines of code, we'll build a backend that reads and writes to the database and automatically updates all users in a chat app.
After that we'll see how to connect to external services and setup your product for success and scale.
Start developing with Convex
Before you begin: You'll need Node.js 18+ and Git
Ensure you have Node.js version 18 or greater installed on your computer. You
can check your version of Node.js by running node --version in your terminal.
If you don't have the appropriate version of Node.js installed,
install it from the Node.js website.
In addition, this walkthrough requires Git, so verify you have it installed by
running git -v in your terminal. If not, head over to the
Git website for
installation instructions.
First, clone the example project repo from GitHub and install the dependencies:
git clone https://github.com/get-convex/convex-tutorial.git
cd convex-tutorial
npm install
This app's dev npm command sets up Convex and then runs the web app:
npm run dev
During setup, you'll see that Convex uses your GitHub account for authentication. Sign into Convex with GitHub and then accept the default project setup prompts.
This will automatically create your backend and a folder called convex/ in
your project, where you'll write your backend code.
Make sure you keep this command (npm run dev) running in the background
throughout this tutorial. It's running both the dev web server for the
frontend as well as the convex command in the background to keep your backend
in sync with your local codebase.
Once your server is up and running, open localhost:5173 and check it out:
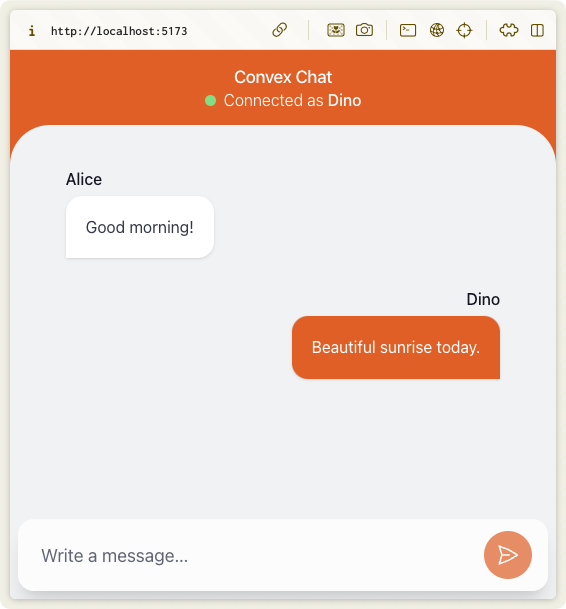
If you try sending a message now, you'll see an alert telling you the mutation is not yet implemented. We'll do that in a bit, but first here's a quick summary of how Convex works.
How Convex works
Database. The Convex database is a document-relational database, which means
you have tables with JSON like documents in them. All documents have an
auto-generated _id that can be used to create relations between documents. You
interact with the database through mutation and query functions that are written
entirely in TypeScript.
Mutation functions. Mutations are TypeScript functions that update the database. All mutation functions in Convex run as a database transaction. So either all the changes are committed, or none are.
Query functions. Queries are TypeScript functions that can only read from the database. As we'll see in a bit, you subscribe to them from your frontend to keep your app automatically up to date.
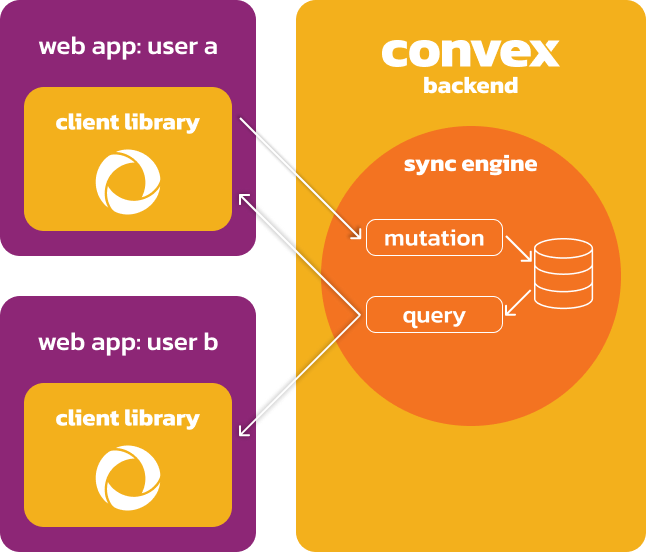
Your frontend registers to listen to query updates through the client library. The client libraries talk to Convex via WebSockets for fast realtime updates.
The sync engine reruns query functions when any input to the function changes, including any changes to the documents in the database that the query reads. It then updates every app listening to the query. The sync engine is the combination of queries, mutations and the database.
Now, let's dive into the code!
Your first mutation
Create a new file in your convex/ folder called chat.ts. This is where
you'll write your Convex backend functions for this application.
Add the following to your convex/chat.ts file.
import { mutation } from "./_generated/server";
import { v } from "convex/values";

export const sendMessage = mutation({
  args: {
    user: v.string(),
    body: v.string(),
  },
  handler: async (ctx, args) => {
    console.log("This TypeScript function is running on the server.");
    await ctx.db.insert("messages", {
      user: args.user,
      body: args.body,
    });
  },
});
Let's break this down:
- You've added a new backend
mutationfunction calledsendMessageand exposed it as a public api. - The whole function automatically runs as a transaction that will roll back if an exception is thrown.
- Since this is just a TypeScript function you can drop
console.loglines to do simple debugging on the server. args:ensures the function arguments are two strings nameduserandbody, both as types and runtime values.ctx.db.inserttells Convex to insert a new message document into the table.
Now, let's connect this mutation to your web app.
Update your src/App.tsx file like so:
// Import `useMutation` and `api` from Convex.
import { useMutation } from "convex/react";
import { api } from "../convex/_generated/api";

//...

export default function App() {
  // Replace the "TODO: Add mutation hook here." with:
  const sendMessage = useMutation(api.chat.sendMessage);

  //...

  return (
    <main className="chat">
      {/* ... */}
      <form
        onSubmit={async (e) => {
          e.preventDefault();
          // Replace "alert("Mutation not implemented yet");" with:
          await sendMessage({ user: NAME, body: newMessageText });

          setNewMessageText("");
        }}
      >
        {/* ... */}
      </form>
    </main>
  );
}
There are two steps to call a mutation in your frontend:
const sendMessage = useMutation(api.chat.sendMessage);gives your frontend app a handle to the mutation functionawait sendMessage({ user: NAME, body: newMessageText });calls the mutation with the proper parameters.
This is a good time to open up the Convex dashboard. Open a new browser
window and go to https://dashboard.convex.dev
and find new convex-tutorial project.
Go to the "Data" screen. So far, there is no data in your database.
Keep your chat app and dashboard windows open side by side. Now try to send some messages from your chat app.
You'll notice new chat messages showing up live in the messages table.
Convex automatically created a messages table when you sent the first message.
In Convex, schemas are optional. Eventually, you'll
want to enforce the structure of your tables, but for the purposes of the
tutorial we'll skip this.
In the dashboard you can also go to the logs screen and see every call to the mutation as you ran with the log line we added earlier. The logs screen is a critical part of debugging your backend in development.
You've successfully created a mutation function, which is also a database
transaction, and connected it to your UI.
Now, let's make sure your app can update live the same way the dashboard is updating live.
Your first query
Update your convex/chat.ts file like this:
// Update your server import like this:
import { query, mutation } from "./_generated/server";

// ...

// Add the following function to the file:
export const getMessages = query({
  args: {},
  handler: async (ctx) => {
    // Get most recent messages first
    const messages = await ctx.db.query("messages").order("desc").take(50);
    // Reverse the list so that it's in a chronological order.
    return messages.reverse();
  },
});
Let's break this down:
- You've added a new backend
queryfunction calledgetMessagesand exposed it as a public api. - Since this is a query function, the
ctx.dbin this function only lets you read data. - In the first line of the
handleryou are querying the most recent 50 messages from newest to oldest. - In the second line you're reversing the list using plain old TypeScript.
Now update src/App.tsx to read from your query:
// Update your convex/react import like this:
import { useQuery, useMutation } from "convex/react";

//...

export default function App() {
  // Replace the `const messages = ...` line with the following
  const messages = useQuery(api.chat.getMessages);

  //...
}
That one useQuery line is doing a lot of work automatically for you. It's
telling the Convex client library to subscribe to your getMessages function.
Anytime there are new messages to show the query function is automatically
rerun. The result is put in const messages variable and React rerenders your
UI component to show the latest messages.
That's it. Now go back to your app and try sending messages.
Your app should be showing live updates as new messages arrive:
Don't believe it? Try opening two chat windows side by side and send some messages:
What you built
With just a few lines of code you've built a live updating chat app.
- You created a
mutationTypeScript function that, in a transaction, adds new chat messages to your database. - You created a
queryTypeScript function updates your app with the latest data. - You used the client library that keeps your frontend in live sync with the backend.
You've learned the fundamentals of Convex and the sync engine that powers everything.
Next up
In this tutorial we just touched on the very basics. It's ok to just stop here and go explore the rest of the docs, including efficient queries via indexes and traversing relationships through joins. If you're deeply curious about how Convex works, you can read this excellent deep dive.
But if you want to see how to call external services and build sophisticated backend workflows, jump into the next section →.
Extend your chat app by calling external APIs using Convex actions and the scheduler to integrate Wikipedia summaries into your application.