S3 Export
For AI agents: see llms.txt for the complete documentation index. Markdown versions are available by adding .md to a page URL or requesting Accept: text/markdown.
S3 export is currently a beta feature. If you have feedback or feature requests, let us know on Discord!
S3 export continuously streams changes to your deployment's tables into an Amazon S3 bucket that you own. Each table is written as an Apache Iceberg table and registered in the AWS Glue Data Catalog, so you can query your data from Amazon Athena, Snowflake, Databricks, Spark, DuckDB, or any other engine that reads Iceberg.
The first sync copies every document in the tables you choose. After that, Convex appends each insert, update, and delete within seconds. Exported tables hold every version of each document, so see Changes and deletes to query your current data.
Convex writes your data to your bucket and registers the tables in Glue, through an IAM role in your AWS account that you can delete at any time. Your data stays in the bucket if you delete the export or your Convex project.
S3 export requires a Convex Pro plan. Learn more about our plans or upgrade.
Setting up an S3 export
Each deployment can have one S3 export.
1. Choose a bucket
- Open the Integrations tab in your deployment's settings in the Dashboard.
- Click + on the AWS S3 card.
- Choose Create a new bucket or Use an existing bucket. New buckets are
named
convex-export-<deployment-name>by default, and the region defaults to your deployment's region. - Optionally, enter a Prefix to put the export in a folder within the bucket.
- Click Continue. This creates the export and its External ID, but nothing syncs until you click Save in step 3.
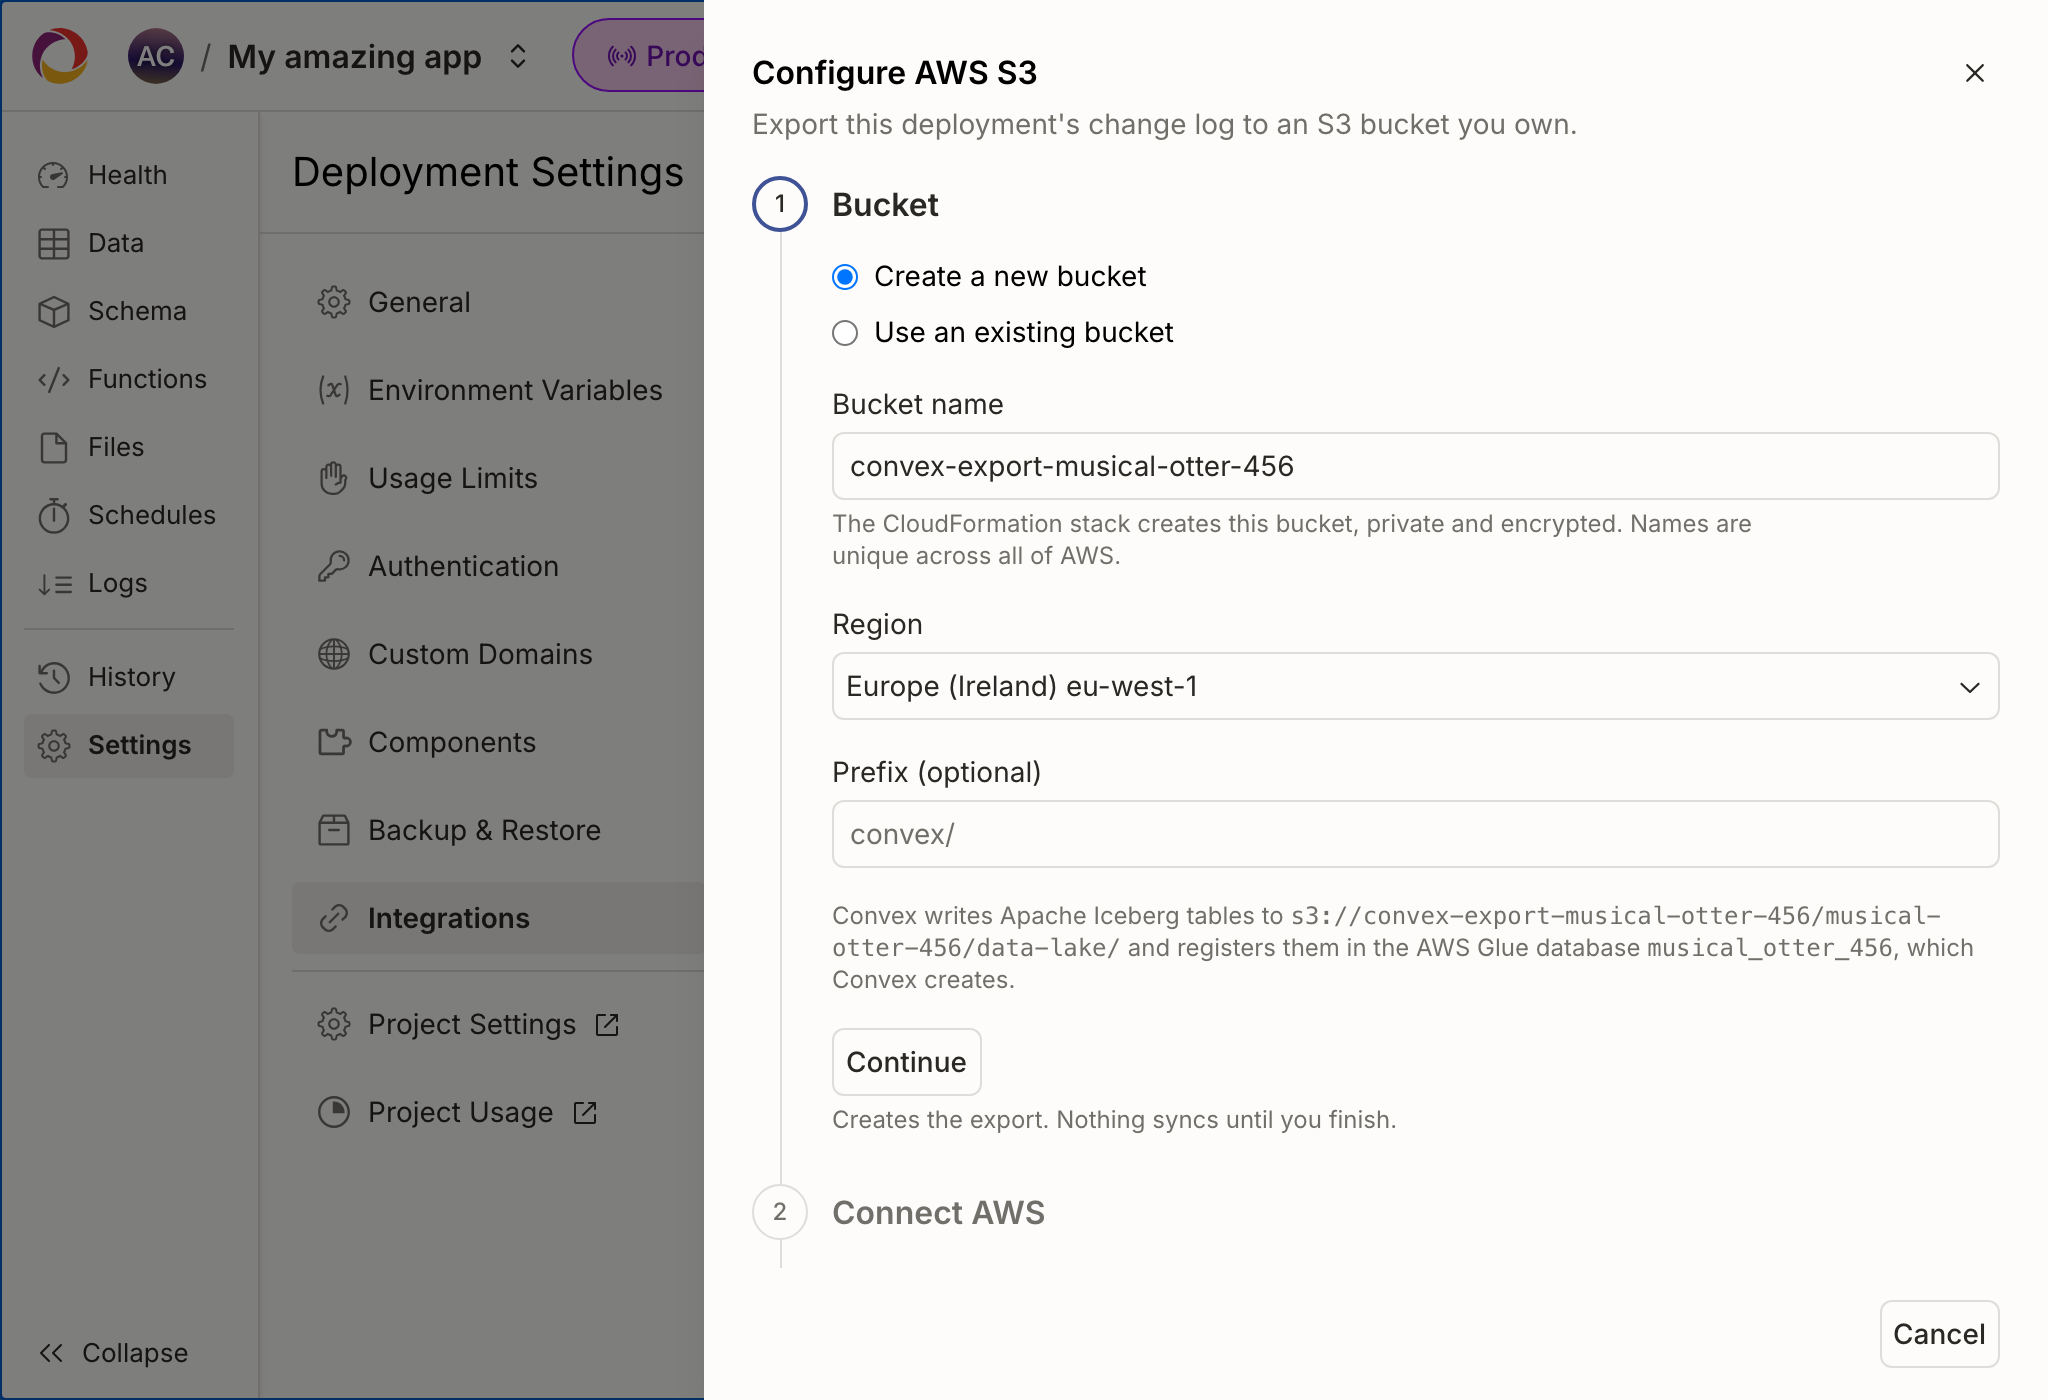
Convex writes the export to
s3://<bucket>/<prefix>/<deployment-name>/data-lake/ (or
s3://<bucket>/<deployment-name>/data-lake/ if you don't set a prefix). The
tables are registered in a Glue database named after your deployment, with
hyphens replaced by underscores. For example, musical-otter-456 becomes
musical_otter_456.
The bucket, region, and prefix can't be changed once the export is created. To change them, delete the export and create a new one, which copies all of your tables again. The old export's files stay in S3.
2. Connect AWS
Next, create the IAM role Convex uses to write to your bucket. You can do this from the AWS console or with Terraform. Both create the same role, and the Dashboard fills in every value for you.
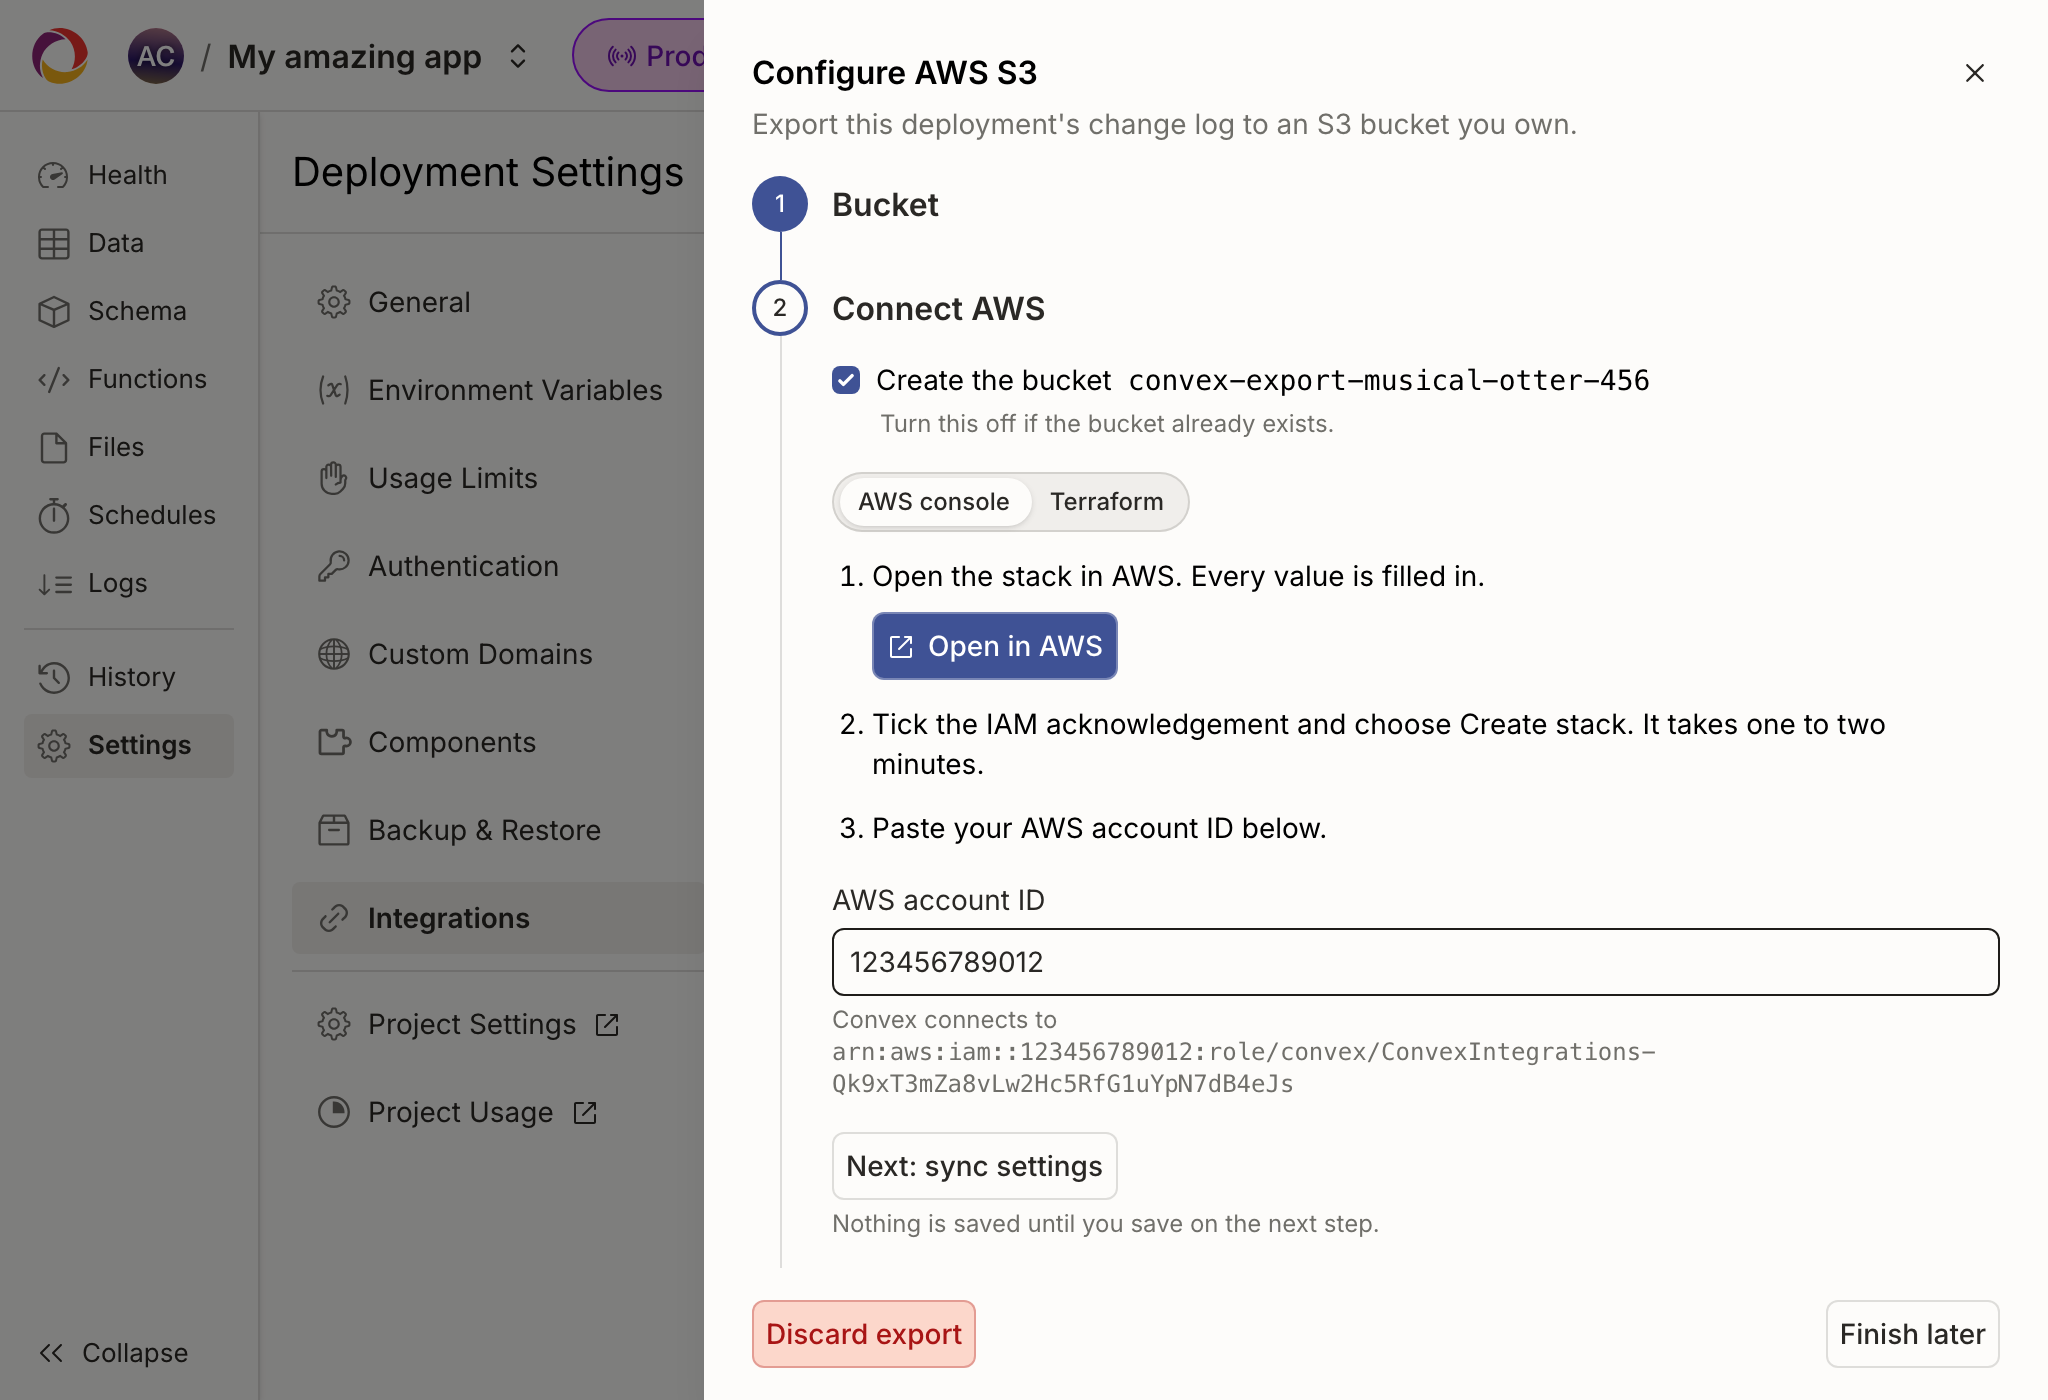
Using the AWS console
- Click Open in AWS. This opens a CloudFormation quick-create page with every parameter already filled in.
- Check the IAM acknowledgement box and click Create stack. The stack usually takes a minute or two to create.
- Back in the Dashboard, enter your 12-digit AWS account ID (you can also paste the stack's ARN). Your account ID is in the account menu in the top right of the AWS console.
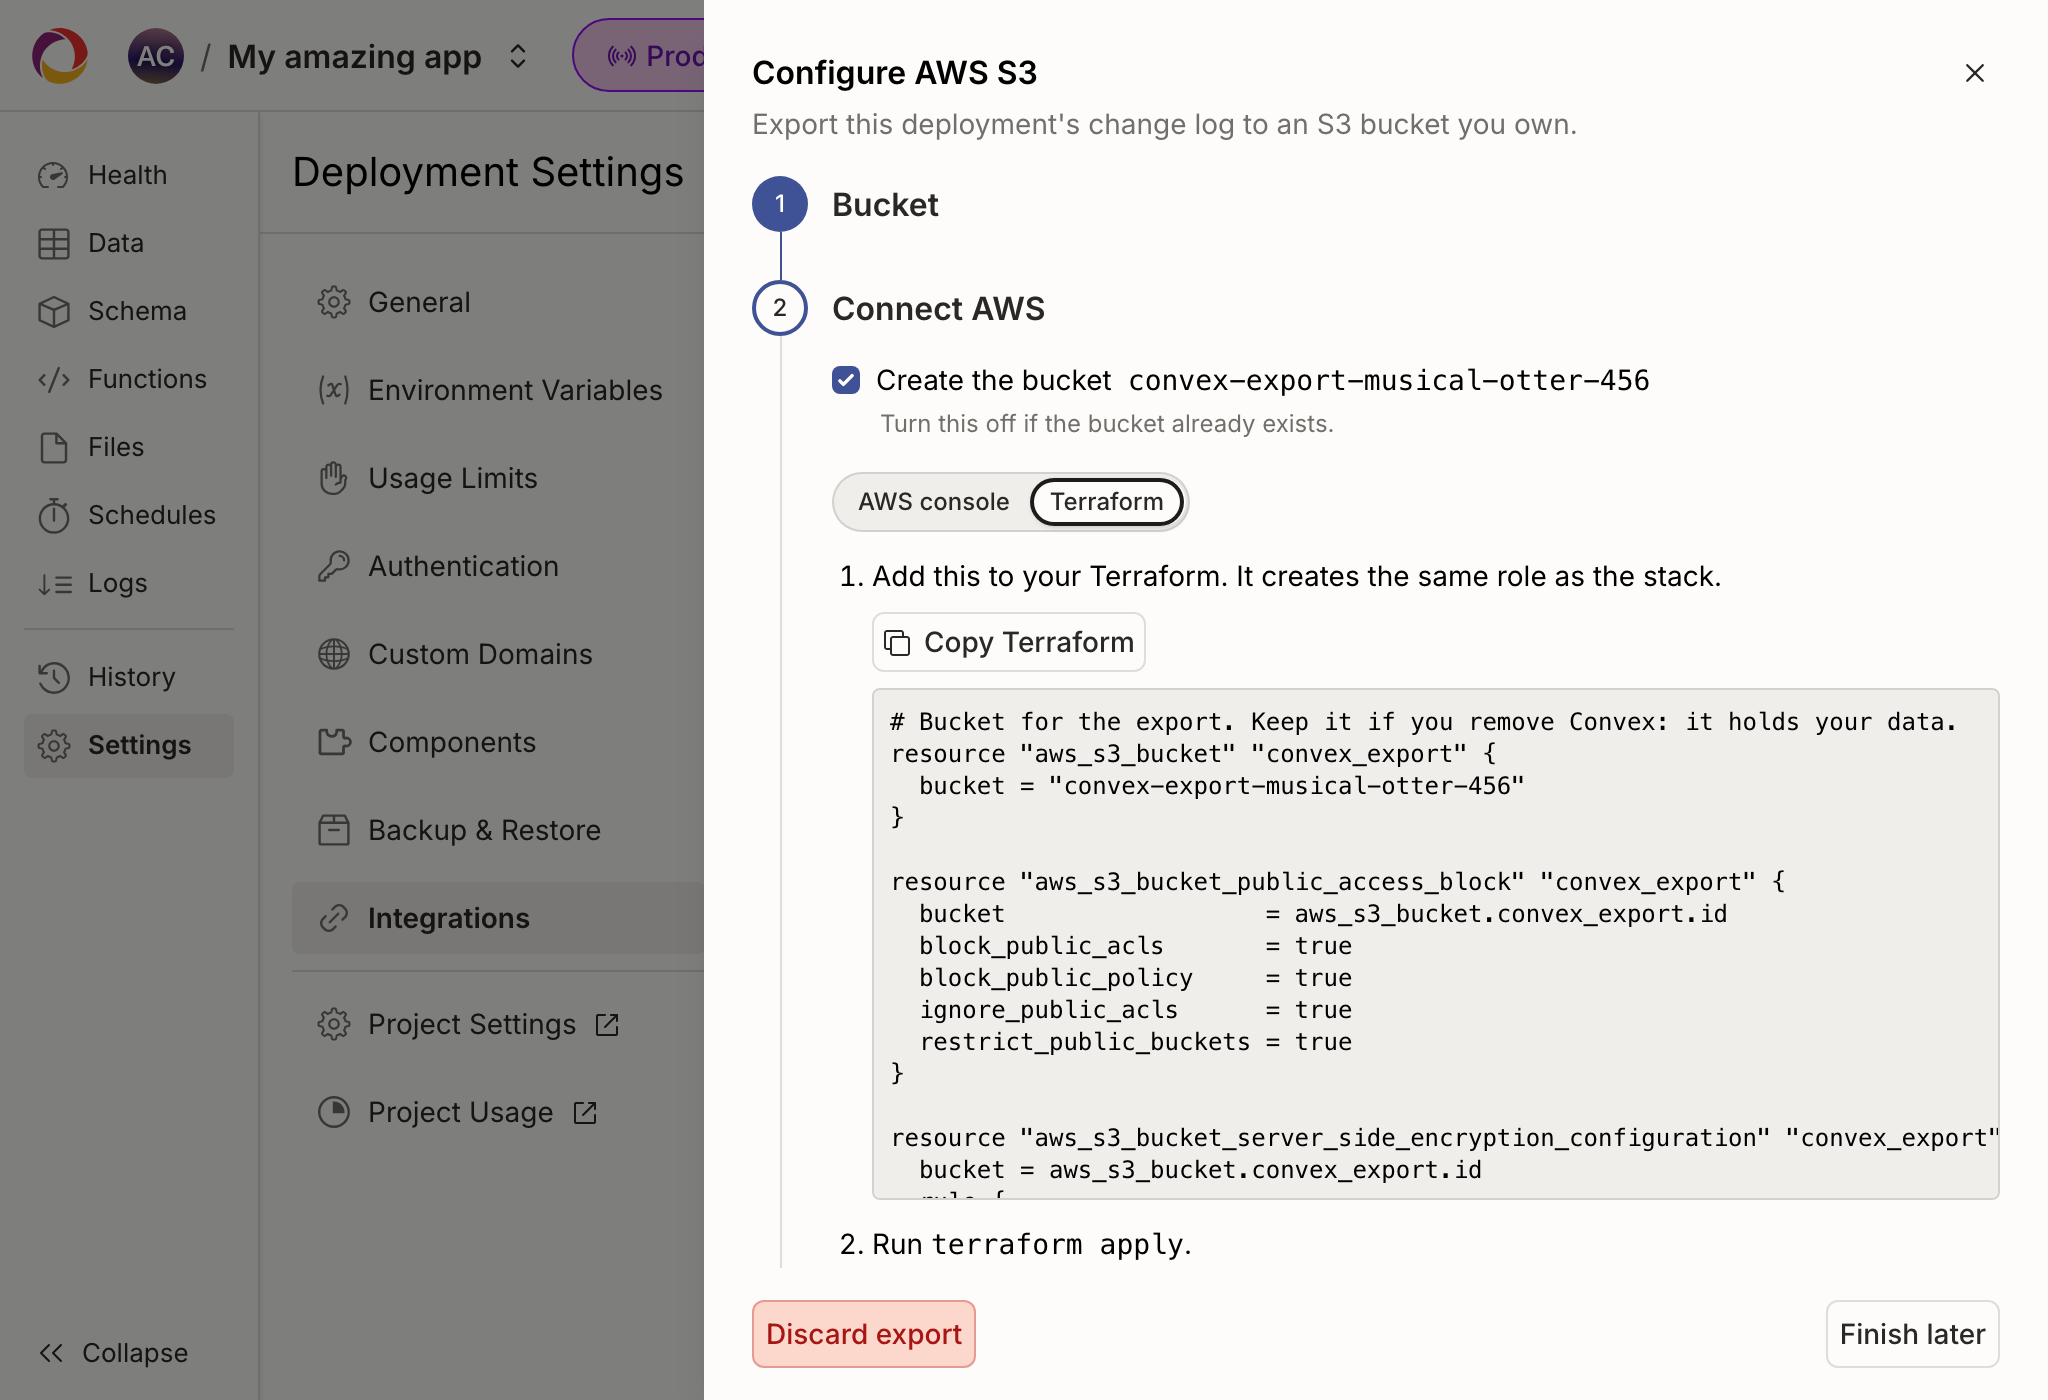
Using Terraform
- Open the Terraform tab and click Copy Terraform.
- Add the snippet to your Terraform configuration and run
terraform apply. Set your AWS provider to the export's region. The snippet creates the bucket there (if you checked Create the bucket) and grants Glue access in that region. - Back in the Dashboard, enter your AWS account ID.
Click Next: sync settings.
3. Choose tables and save
By default, Convex exports every table, including tables that belong to components like aggregates and workpools. Uncheck Include component tables to export only your app's own tables, or open Choose specific tables to pick individual tables. You can also choose whether tables you add later are exported automatically.
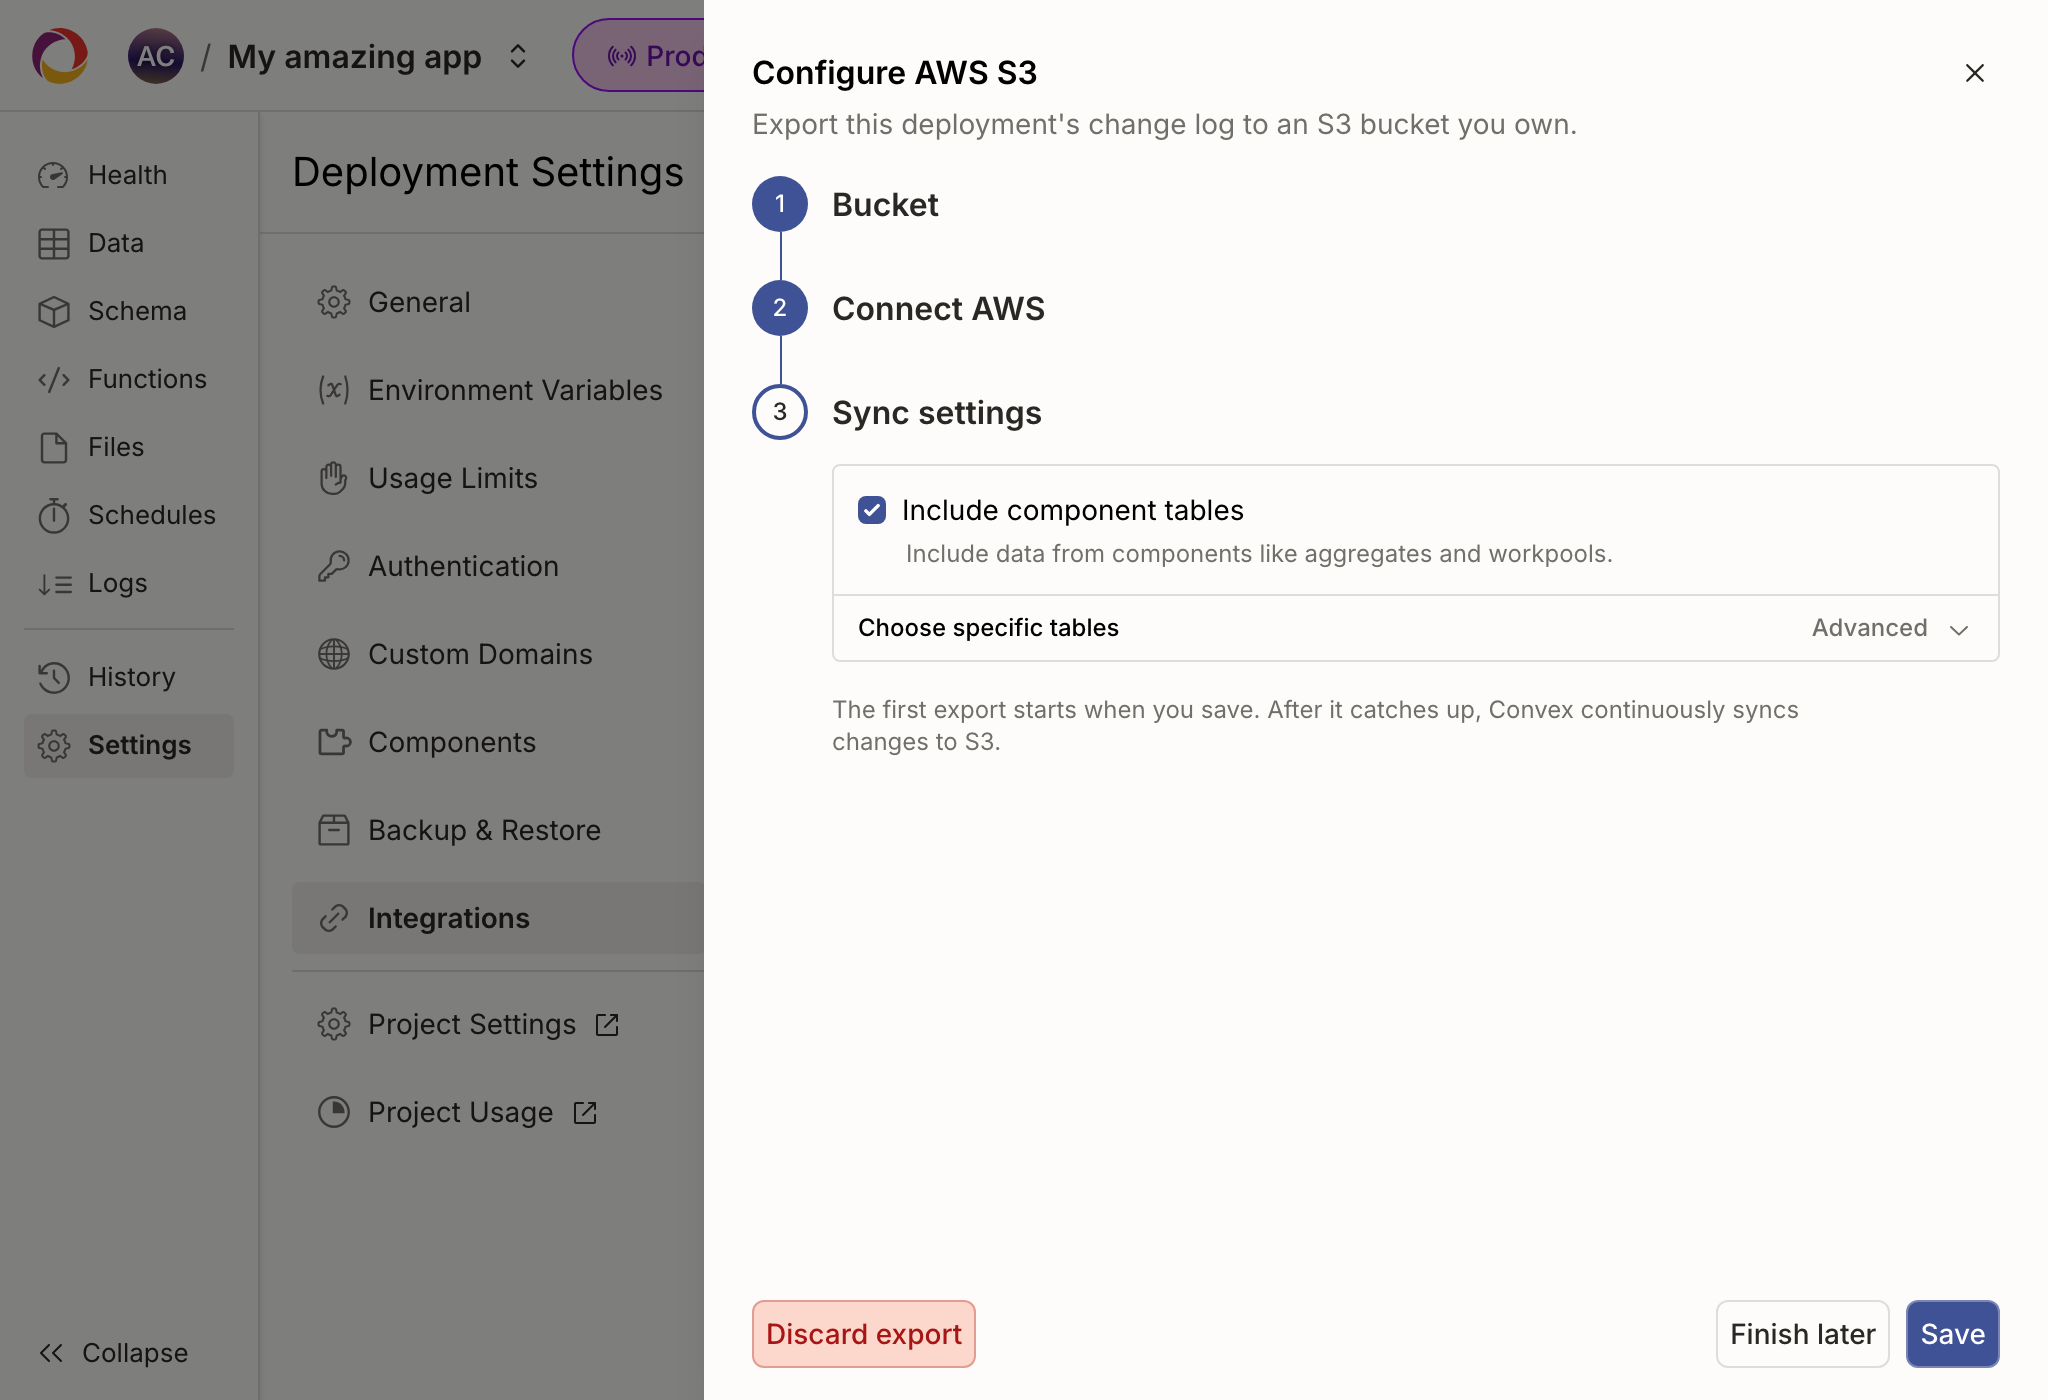
Click Save to start the first sync. The integration card shows Starting first sync, followed by its progress. Once the export has caught up with your deployment, the card shows Active along with the time of the last sync.
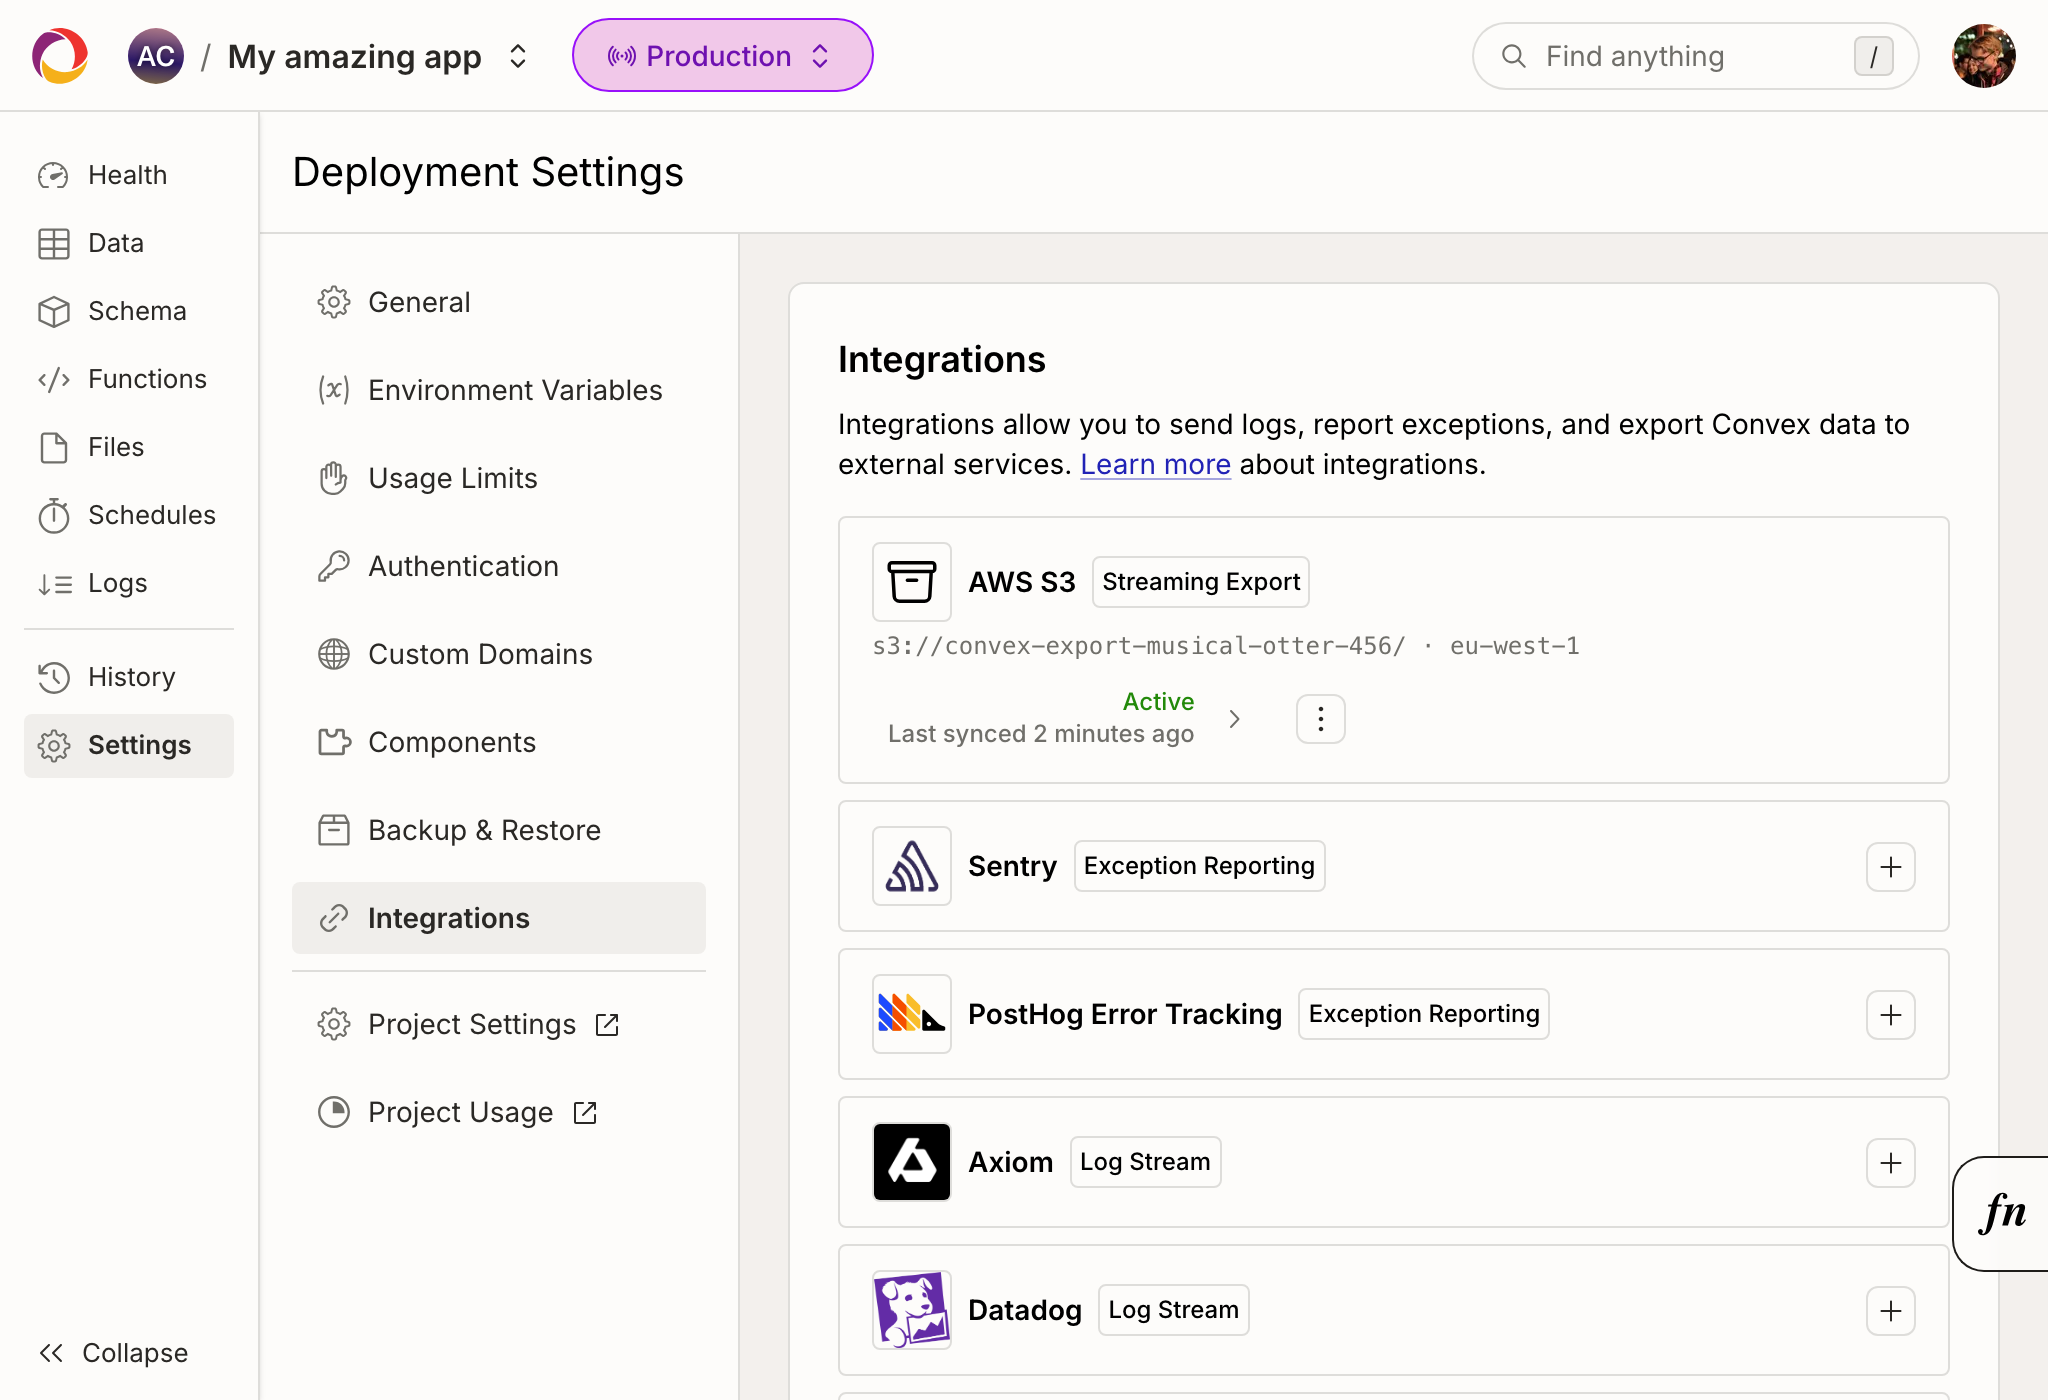
You can change which tables are exported at any time. Tables you're already exporting keep their progress, newly added tables sync from the beginning, and removed tables stay in S3 but stop updating.
If you click Finish later before saving, the export stays pending. To pick up where you left off, open the ⋮ menu on the card and click Configure, or click Discard export to delete it.
Permissions
The role created by CloudFormation or Terraform can only write the export's files and register its tables in Glue:
| Permission | Scope |
|---|---|
s3:GetBucketLocation | The bucket |
s3:ListBucket | <prefix>/<deployment-name>/data-lake/ |
s3:GetObjects3:PutObjects3:DeleteObjects3:AbortMultipartUpload | Objects under <prefix>/<deployment-name>/data-lake/ |
glue:GetDatabaseglue:CreateDatabase | The catalog and the deployment's Glue database |
glue:GetTableglue:GetTablesglue:CreateTableglue:UpdateTableglue:DeleteTable | Tables in the deployment's Glue database |
The role's trust policy only allows Convex's export role to assume it, and only with your export's External ID.
If the stack or Terraform creates the bucket for you, it blocks all public access, encrypts objects with SSE-S3 (AES-256), and cleans up incomplete multipart uploads after seven days.
Example Terraform
The Dashboard generates this snippet with your bucket, deployment name, and
External ID. This example is for the deployment musical-otter-456 with a new
bucket.
# Bucket for the export. Keep it if you remove Convex: it holds your data.
resource "aws_s3_bucket" "convex_export" {
  bucket = "convex-export-musical-otter-456"
}

resource "aws_s3_bucket_public_access_block" "convex_export" {
  bucket                  = aws_s3_bucket.convex_export.id
  block_public_acls       = true
  block_public_policy     = true
  ignore_public_acls      = true
  restrict_public_buckets = true
}

resource "aws_s3_bucket_server_side_encryption_configuration" "convex_export" {
  bucket = aws_s3_bucket.convex_export.id
  rule {
    apply_server_side_encryption_by_default { sse_algorithm = "AES256" }
  }
}

resource "aws_s3_bucket_lifecycle_configuration" "convex_export" {
  bucket = aws_s3_bucket.convex_export.id
  rule {
    id     = "abort-incomplete-uploads"
    status = "Enabled"
    filter {}
    abort_incomplete_multipart_upload { days_after_initiation = 7 }
  }
}

# Role Convex assumes to write this deployment's data lake export.
resource "aws_iam_role" "convex_export" {
  name = "ConvexIntegrations-<external-id>"
  path = "/convex/"
  assume_role_policy = jsonencode({
    Version = "2012-10-17"
    Statement = [{
      Effect    = "Allow"
      Action    = "sts:AssumeRole"
      Principal = { AWS = "arn:aws:iam::715951115348:root" }
      Condition = {
        StringEquals = { "sts:ExternalId" = "<external-id>" }
        ArnEquals    = { "aws:PrincipalArn" = "arn:aws:iam::715951115348:role/convex-s3-export-prod" }
      }
    }]
  })
}

resource "aws_iam_role_policy" "convex_export" {
  role = aws_iam_role.convex_export.id
  name = "data-lake"
  policy = jsonencode({
    Version = "2012-10-17"
    Statement = [
      {
        Effect   = "Allow"
        Action   = "s3:GetBucketLocation"
        Resource = "arn:aws:s3:::convex-export-musical-otter-456"
      },
      {
        Effect    = "Allow"
        Action    = "s3:ListBucket"
        Resource  = "arn:aws:s3:::convex-export-musical-otter-456"
        Condition = { StringLike = { "s3:prefix" = ["musical-otter-456/data-lake/*", "musical-otter-456/data-lake"] } }
      },
      {
        Effect   = "Allow"
        Action   = ["s3:GetObject", "s3:PutObject", "s3:DeleteObject", "s3:AbortMultipartUpload"]
        Resource = "arn:aws:s3:::convex-export-musical-otter-456/musical-otter-456/data-lake/*"
      },
      {
        Effect = "Allow"
        Action = [
          "glue:GetDatabase", "glue:CreateDatabase", "glue:GetTable", "glue:GetTables",
          "glue:CreateTable", "glue:UpdateTable", "glue:DeleteTable",
        ]
        Resource = [
          "arn:aws:glue:${data.aws_region.current.name}:${data.aws_caller_identity.current.account_id}:catalog",
          "arn:aws:glue:${data.aws_region.current.name}:${data.aws_caller_identity.current.account_id}:database/musical_otter_456",
          "arn:aws:glue:${data.aws_region.current.name}:${data.aws_caller_identity.current.account_id}:table/musical_otter_456/*",
        ]
      },
    ]
  })
}

data "aws_region" "current" {}
data "aws_caller_identity" "current" {}

# Paste this, or your AWS account ID, into the Convex dashboard.
output "convex_export_role_arn" {
  value = aws_iam_role.convex_export.arn
}
Table format
Table names
Each Convex table becomes an Iceberg table in your deployment's Glue database, named like this:
<component>__<table>__<table-id>
<component>isappfor your app's own tables. For a component's tables, it's the component path with each/replaced by__.<table>is the table name in lowercase.<table-id>is a fixed-length ID that keeps names unique. For example, it keeps tables namedUsersandusersapart, since Glue names are always lowercase.
For example, your app's messages table becomes something like
app__messages__<table-id>. To find the exact names, run SHOW TABLES in
Athena or browse the database in the Glue console. Convex won't touch other
tables you create in the same Glue database.
The <table-id> changes when a table is replaced, for example by
npx convex import --replace or by deleting and recreating the table. When that
happens, the export writes to a new Iceberg table with a new name and the old
one stops updating, so update any queries that refer to the table by name.
Columns
Every table starts with these columns, followed by a column for each top-level field in your documents, up to 1,024 field columns per table:
| Column | Type | Description |
|---|---|---|
_id | string | The document's ID |
_ts | long | When this version of the document was committed, in nanoseconds since the Unix epoch |
_convex_deleted | boolean | true if this row records that the document was deleted |
_creationTime | timestamptz | The document's _creationTime. Empty for deletes |
_convex_rescued | string | Fields that don't fit their column, as a JSON object. See Rescued fields |
Document fields map to Iceberg types as follows:
| Convex type | Iceberg type |
|---|---|
string, Id | string |
float64 | double |
int64 | long |
boolean | boolean |
bytes | binary |
array, object, record | string containing JSON |
any | string containing JSON |
| A union of more than one type | string containing JSON |
A union of int64 and float64 | double |
Unions only count their non-null types, so v.optional(v.string()) and
v.union(v.string(), v.null()) both get a string column, as does a union of
string literals. A null value is stored as NULL in the field's column, or in
_convex_rescued if the field doesn't have a column yet.
JSON values use the same encoding as
snapshot exports: an int64 is a JSON
number, and bytes is {"$bytes": "<base64>"}.
If a table has a schema with validation turned on, Convex creates its columns from the schema when the table first syncs. Otherwise, it uses the types of the documents already in the table. New fields get a column the first time a document containing them syncs.
Once a column is created, its type doesn't change. If you later change a field's
type in your schema, new values for that field are written to _convex_rescued.
Rescued fields
The export never fails because of the shape of your data. If a value doesn't fit
its column, Convex writes it to _convex_rescued instead. This happens when:
- The value's type doesn't match the column, like a
stringin alongcolumn. Adoublecolumn does accept anint64it can store exactly. - The field name isn't a valid column name, or differs from an existing column only by case.
- The field name is reserved by Iceberg or by the export.
- The table already has 1,024 field columns.
Changes and deletes
Each exported table is an append-only log. Every insert, update, and delete adds
a row with the full document as of that change, so one document can have many
rows. Deletes are a row with _convex_deleted = true and no field values.
Querying an exported table directly returns every version of every document,
including deleted ones. To get your current data, keep the row with the highest
_ts for each _id and skip rows where _convex_deleted is true. Retried
syncs can write the same row twice, so treat (_id, _ts) as the unique key.
For example, in Athena:
SELECT *
FROM (
  SELECT
    *,
    row_number() OVER (PARTITION BY _id ORDER BY _ts DESC) AS version
  FROM "musical_otter_456"."app__messages__<table-id>"
)
WHERE version = 1 AND NOT _convex_deleted;
To reuse this query, save it as a view.
Convex keeps the last 10 Iceberg snapshots of each table, so time travel only
goes back a few syncs. To read changes incrementally, filter on _ts instead.
Tables that change often build up many small files, which slows queries. Don't
compact them yourself: an OPTIMIZE breaks the export (see
Monitoring and errors).
Monitoring and errors
The integration card on the Integrations tab shows the export's status:
- Finish AWS setup: The export doesn't have a role yet. Open it and finish connecting AWS.
- Starting first sync: Convex is connecting to your bucket.
- Syncing: The first sync is running, or the export is catching up with your deployment. Open the card to see its progress.
- Active: The export is up to date. Open the card to see the bucket path, the Glue database, and when it last synced.
- Failed: Convex can't write to your bucket, or the last ten syncs failed. Open the card to see why.
To get alerted when an export fails or falls behind, subscribe a
log stream
to the s3_export_stats topic.
Common reasons an export fails:
- The CloudFormation stack is still being created, or failed to create.
- The account ID is wrong, or the role was deleted.
- The bucket doesn't exist, or it's in a different region than the export.
- A policy in your account, such as a service control policy, blocks an S3 or Glue action.
- Something other than Convex modified the export's Iceberg tables, like an
Athena
OPTIMIZE. The export's tables should be treated as read-only.
Convex keeps retrying a failed export. Once you fix the problem, the next successful sync marks the export Active again, with no need to save it again. If the tables were modified outside Convex, delete the export and create a new one.
An export can only catch up on changes your deployment still has in its history, which is about two weeks. If an export stays failed for longer than that, it can't resume, and you'll need to delete it and create a new one.
Deleting an S3 export
To stop the export, open the ⋮ menu on the integration card, click Delete, and confirm. Convex stops writing to your bucket within a few seconds. Your files stay in your bucket. The Glue tables stay until you create a new export, which replaces them.
To fully remove Convex's access, delete the CloudFormation stack or remove the role from your Terraform configuration. Deleting the stack keeps the bucket and its files. Terraform can't delete a bucket that still contains files, so empty it first or remove the bucket from your configuration.
Feedback
Please reach out with any questions, comments, or suggestions on Discord.