Adding WorkOS AuthKit to an Existing App
Follow along to learn how to configure an existing Convex application to use WorkOS AuthKit.
If you're just getting started with Convex and WorkOS AuthKit, see the Getting Started instructions instead.
Project configuration
The first step to getting your app up and running with WorkOS AuthKit is getting your Convex project properly configured. Most users should opt for using a Managed WorkOS team where Convex provisions and automatically configures WorkOS environments for projects and deployments. If you have an existing WorkOS team and account that you want to use with your Convex application then you should follow the Standard WorkOS team instructions.
Setting up the Managed WorkOS team and inviting members to it require team admin. Per-deployment WorkOS environments use the deployment's own management permission, so any team member can provision one for their dev/preview deployment, while prod envs and shared project-level envs require team admin or project admin.
- Managed WorkOS team
- Standard WorkOS team
- Create or update convex.json
You'll need a
convex.jsonfile in the root of your project with contents that match your framework. You can find more details about theauthKitsection ofconvex.jsonin the Automatic Config docs.If you don't see an example for your framework, consult its documentation for details about how to specify environment variables and which ports it uses for development servers and alter one of the examples accordingly.
Take care to not expose your
WORKOS_API_KEYin a public environment variable. On the other hand, theWORKOS_CLIENT_IDis safe to include in your client bundle.- React (Vite)
- Next.js
- TanStack Start
convex.json{"authKit": {"dev": {"configure": {"redirectUris": ["http://localhost:5173/callback"],"appHomepageUrl": "http://localhost:5173","corsOrigins": ["http://localhost:5173"]},"localEnvVars": {"VITE_WORKOS_CLIENT_ID": "${authEnv.WORKOS_CLIENT_ID}","VITE_WORKOS_REDIRECT_URI": "http://localhost:5173/callback"}},"preview": {"configure": {"redirectUris": ["https://${buildEnv.VERCEL_BRANCH_URL}/callback"],"appHomepageUrl": "https://${buildEnv.VERCEL_PROJECT_PRODUCTION_URL}","corsOrigins": ["https://${buildEnv.VERCEL_BRANCH_URL}"]}},"prod": {"configure": {"redirectUris": ["https://${buildEnv.VERCEL_PROJECT_PRODUCTION_URL}/callback"],"appHomepageUrl": "https://${buildEnv.VERCEL_PROJECT_PRODUCTION_URL}","corsOrigins": ["https://${buildEnv.VERCEL_PROJECT_PRODUCTION_URL}"]}}}}convex.json{"authKit": {"dev": {"configure": {"redirectUris": ["http://localhost:3000/callback"],"appHomepageUrl": "http://localhost:3000","corsOrigins": ["http://localhost:3000"]},"localEnvVars": {"WORKOS_CLIENT_ID": "${authEnv.WORKOS_CLIENT_ID}","WORKOS_API_KEY": "${authEnv.WORKOS_API_KEY}","NEXT_PUBLIC_WORKOS_REDIRECT_URI": "http://localhost:3000/callback"}},"preview": {"configure": {"redirectUris": ["https://${buildEnv.VERCEL_BRANCH_URL}/callback"],"appHomepageUrl": "https://${buildEnv.VERCEL_PROJECT_PRODUCTION_URL}","corsOrigins": ["https://${buildEnv.VERCEL_BRANCH_URL}"]}},"prod": {"environmentType": "production","configure": {"redirectUris": ["https://${buildEnv.VERCEL_PROJECT_PRODUCTION_URL}/callback"],"appHomepageUrl": "https://${buildEnv.VERCEL_PROJECT_PRODUCTION_URL}","corsOrigins": ["https://${buildEnv.VERCEL_PROJECT_PRODUCTION_URL}"]}}}}convex.json{"authKit": {"dev": {"configure": {"redirectUris": ["http://localhost:3000/callback"],"appHomepageUrl": "http://localhost:3000","corsOrigins": ["http://localhost:3000"]},"localEnvVars": {"WORKOS_CLIENT_ID": "${authEnv.WORKOS_CLIENT_ID}","WORKOS_API_KEY": "${authEnv.WORKOS_API_KEY}","WORKOS_REDIRECT_URI": "http://localhost:3000/callback"}},"preview": {"configure": {"redirectUris": ["https://${buildEnv.VERCEL_BRANCH_URL}/callback"],"appHomepageUrl": "https://${buildEnv.VERCEL_PROJECT_PRODUCTION_URL}","corsOrigins": ["https://${buildEnv.VERCEL_BRANCH_URL}"]}},"prod": {"configure": {"redirectUris": ["https://${buildEnv.VERCEL_PROJECT_PRODUCTION_URL}/callback"],"appHomepageUrl": "https://${buildEnv.VERCEL_PROJECT_PRODUCTION_URL}","corsOrigins": ["https://${buildEnv.VERCEL_PROJECT_PRODUCTION_URL}"]}}}} - Create or update auth.config.ts
In your app's
convex/folder, create or update theauth.config.tsfile with the following code. This is the server-side configuration for validating access tokens.convex/auth.config.tsconst clientId = process.env.WORKOS_CLIENT_ID;const authConfig = {providers: [{type: "customJwt",issuer: `https://api.workos.com/`,algorithm: "RS256",jwks: `https://api.workos.com/sso/jwks/${clientId}`,applicationID: clientId,},{type: "customJwt",issuer: `https://api.workos.com/user_management/${clientId}`,algorithm: "RS256",jwks: `https://api.workos.com/sso/jwks/${clientId}`,},],};export default authConfig; - Deploy your configuration to your dev environment
During deployment, you will be prompted to create a new Convex-managed WorkOS team or an existing one will be detected and used. Convex will then provision a new environment for your application in your WorkOS team.
npx convex dev
- Find your WorkOS Client ID and API Key
From the WorkOS dashboard get started page under Quick start, find your
WORKOS_CLIENT_IDandWORKOS_API_KEY.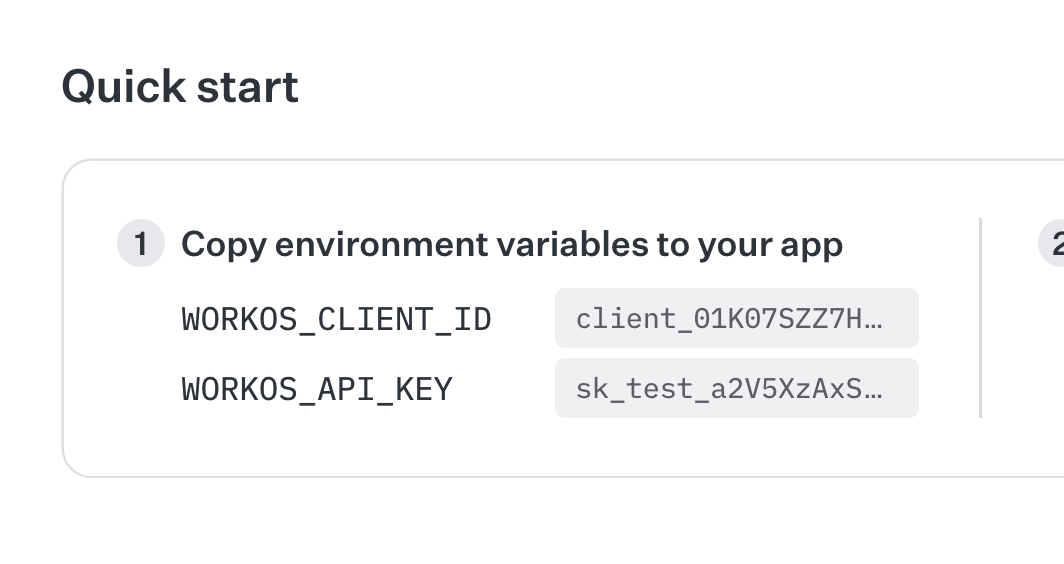
- Set the values in your deployment
Use the
npx convexCLI to set environment variables forWORKOS_CLIENT_IDandWORKOS_API_KEYwith values from the WorkOS dashboard in the previous step.npx convex env set WORKOS_CLIENT_ID $YOUR_CLIENT_ID_HEREnpx convex env set WORKOS_API_KEY $YOUR_API_KEY_HERE - Configure auth with the WorkOS Client ID
In your app's
convex/folder, create a new fileauth.config.tswith the following code. This is the server-side configuration for validating access tokens.convex/auth.config.tsconst clientId = process.env.WORKOS_CLIENT_ID;const authConfig = {providers: [{type: "customJwt",issuer: `https://api.workos.com/`,algorithm: "RS256",jwks: `https://api.workos.com/sso/jwks/${clientId}`,applicationID: clientId,},{type: "customJwt",issuer: `https://api.workos.com/user_management/${clientId}`,algorithm: "RS256",jwks: `https://api.workos.com/sso/jwks/${clientId}`,},],};export default authConfig; - Deploy your changes
Run
npx convex devto automatically sync your configuration to your backend.npx convex dev
Read on to learn how to update your client code to integrate WorkOS AuthKit.
Client configuration
Convex offers a provider that is specifically for integrating with WorkOS
AuthKit called <ConvexProviderWithAuthKit>. It works using WorkOS's
authkit-react SDK.
Once you've completed the WorkOS setup above, choose your framework below to continue with the integration.
See the following sections for the WorkOS SDK that you're using.
- React
- Next.js
- TanStack Start
Example: React with Convex and AuthKit
This guide assumes you have AuthKit set up and have a working React app with Convex. If not follow the Convex React Quickstart first. Then:
- Set up CORS in the WorkOS Dashboardtip
If you're using a Convex-managed WorkOS team, this was done for you in Project configuration.
In your WorkOS Dashboard, go to Authentication > Sessions > Cross-Origin Resource Sharing (CORS) and click on Manage. Add your local development domain (e.g.,
http://localhost:5173for Vite) to the list. You'll also need to add your production domain when you deploy. This enables your application to authenticate users through WorkOS AuthKit.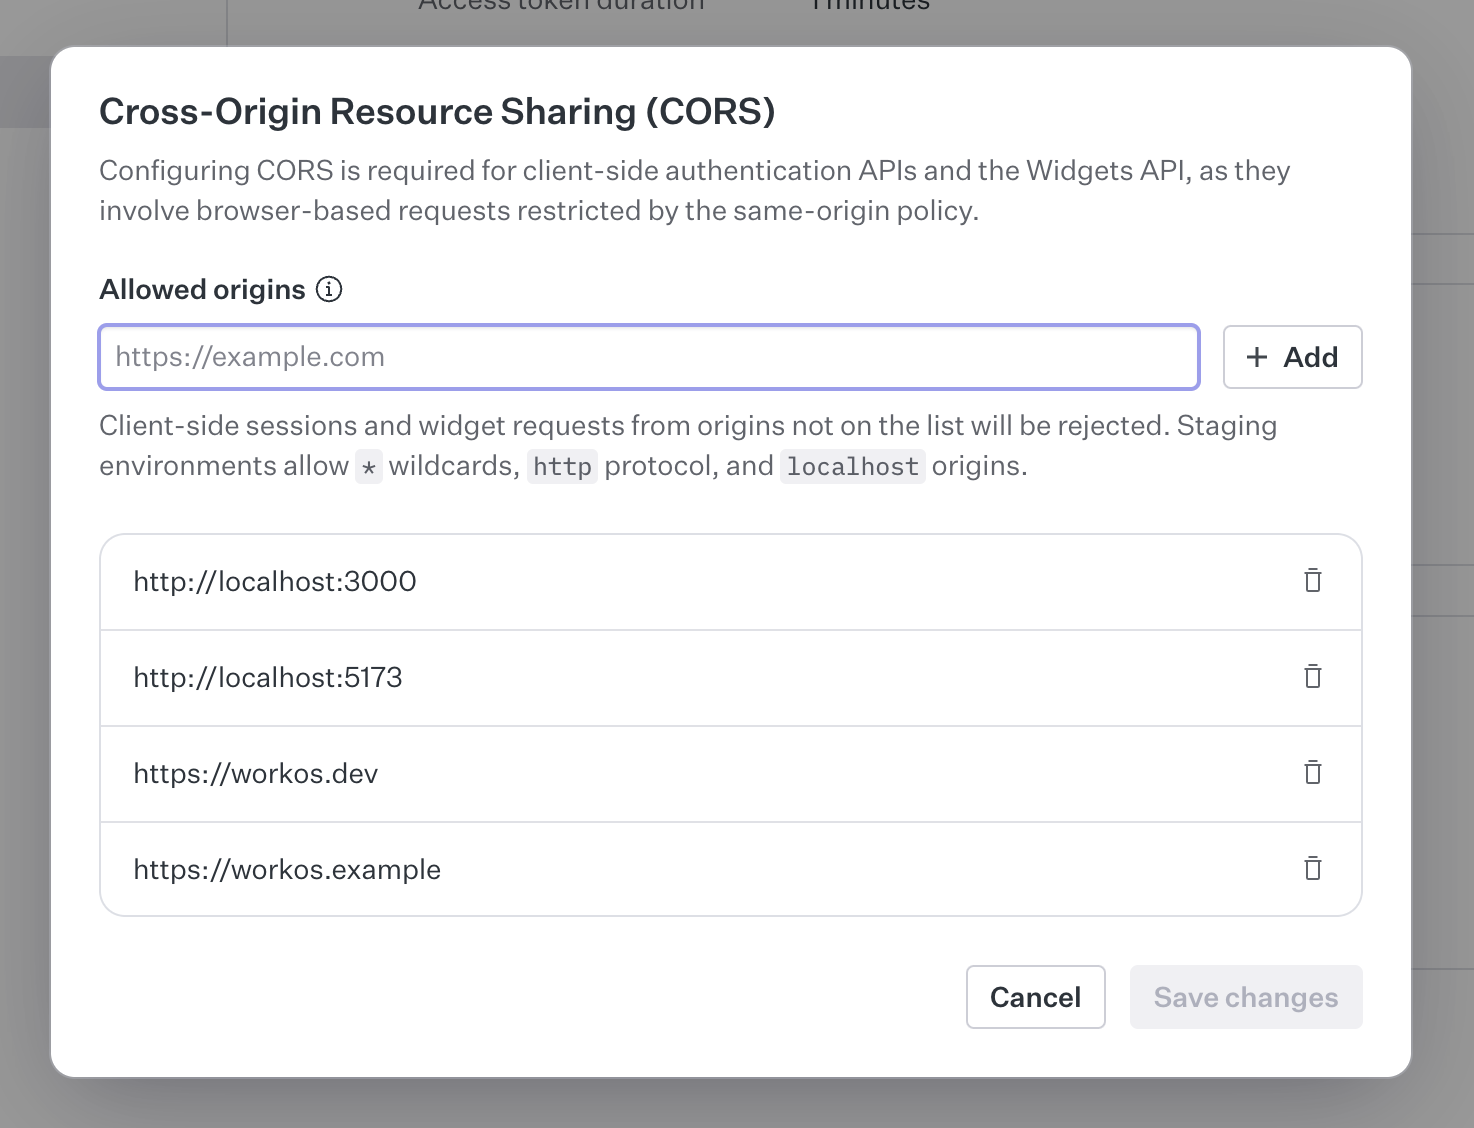
- Set up your environment variablestip
If you're using a Convex-managed WorkOS team, this was done for you in Project configuration.
In your
.env.localfile, add yourWORKOS_CLIENT_IDandWORKOS_REDIRECT_URIenvironment variables. If you're using Vite, you'll need to prefix it withVITE_.Note: These values can be found in your WorkOS Dashboard.
.env.local# WorkOS AuthKit ConfigurationVITE_WORKOS_CLIENT_ID=your-workos-client-id-hereVITE_WORKOS_REDIRECT_URI=http://localhost:5173/callback - Install AuthKit
In a new terminal window, install the AuthKit React SDK:
npm install @workos-inc/authkit-react @convex-dev/workos - Configure ConvexProviderWithAuthKit
AuthKit and Convex both have provider components that provide authentication and client context to your app.
You should already have
<ConvexProvider>wrapping your app. Replace it with<ConvexProviderWithAuthKit>, and pass WorkOS'suseAuth()hook to it.Then, wrap it with
<AuthKitProvider>.<AuthKitProvider>requiresclientIdandredirectUriprops, which you can set toVITE_WORKOS_CLIENT_IDandVITE_WORKOS_REDIRECT_URI, respectively.src/main.tsximport { StrictMode } from "react";import { createRoot } from "react-dom/client";import { AuthKitProvider, useAuth } from "@workos-inc/authkit-react";import { ConvexReactClient } from "convex/react";import { ConvexProviderWithAuthKit } from "@convex-dev/workos";import "./index.css";import App from "./App.tsx";const convex = new ConvexReactClient(import.meta.env.VITE_CONVEX_URL);createRoot(document.getElementById("root")!).render(<StrictMode><AuthKitProviderclientId={import.meta.env.VITE_WORKOS_CLIENT_ID}redirectUri={import.meta.env.VITE_WORKOS_REDIRECT_URI}><ConvexProviderWithAuthKit client={convex} useAuth={useAuth}><App /></ConvexProviderWithAuthKit></AuthKitProvider></StrictMode>,); - Show UI based on authentication state
You can control which UI is shown when the user is signed in or signed out using Convex's
<Authenticated>,<Unauthenticated>,<AuthLoading>and<AuthRefreshing>helper components.In the following example, the
<Content />component is a child of<Authenticated>, so its content and any of its child components are guaranteed to have an authenticated user, and Convex queries can require authentication.tipIf you choose to build your own auth-integrated components without using the helpers, it's important to use the
useConvexAuth()hook instead of AuthKit'suseAuth()hook when you need to check whether the user is logged in or not. TheuseConvexAuth()hook makes sure that the browser has fetched the auth token needed to make authenticated requests to your Convex backend, and that the Convex backend has validated it.src/App.tsximport { Authenticated, Unauthenticated, useQuery } from 'convex/react';import { api } from '../convex/_generated/api';import { useAuth } from '@workos-inc/authkit-react';export default function App() {const { user, signIn, signOut } = useAuth();return (<div className="p-4"> <div className="flex justify-between items-center mb-4"><h1>Convex + AuthKit</h1><button onClick={() => (user ? signOut() : void signIn())}>{user ? 'Sign out' : 'Sign in'}</button></div><Authenticated><Content /></Authenticated><Unauthenticated><p>Please sign in to view data</p></Unauthenticated></div>);}function Content() {const data = useQuery(api.myFunctions.listNumbers, { count: 10 });if (!data) return <p>Loading...</p>;return (<div><p>Welcome {data.viewer}!</p><p>Numbers: {data.numbers?.join(', ') || 'None'}</p></div>);} - Use authentication state in your Convex functions
If the client is authenticated, you can access the information stored in the JWT via
ctx.auth.getUserIdentity.If the client isn't authenticated,
ctx.auth.getUserIdentitywill returnnull.Make sure that the component calling this query is a child of
<Authenticated>fromconvex/react. Otherwise, it will throw on page load.convex/myFunctions.tsimport { v } from "convex/values";import { query } from "./_generated/server";export const listNumbers = query({args: {count: v.number(),},handler: async (ctx, args) => {const identity = await ctx.auth.getUserIdentity();if (identity === null) {throw new Error("Not authenticated");}const numbers = await ctx.db.query("numbers")// Ordered by _creationTime, return most recent.order("desc").take(args.count);return {viewer: identity.name,numbers: numbers.reverse().map((number) => number.value),};},});
Note: The React template includes additional features and functions for a complete working application. This tutorial covers the core integration steps, but the template provides a more comprehensive implementation.
Example: Next.js with Convex and AuthKit
This guide assumes you have AuthKit set up and have a working Next.js app with Convex. If not follow the Convex Next.js Quickstart first. Then:
- Set up your environment variablestip
If you're using a Convex-managed WorkOS team, this was done for you in Project configuration.
Update your
.env.localfile to look something like this example.Note:
WORKOS_CLIENT_IDandWORKOS_API_KEYcan be found in your WorkOS Dashboard.WORKOS_COOKIE_PASSWORD: A secure password used to encrypt session cookies. This must be at least 32 characters long. You can generate a random one withopenssl rand -base64 24.NEXT_PUBLIC_WORKOS_REDIRECT_URI: The URL where users are redirected after authentication. This must be configured in both your environment variables and your WorkOS Dashboard application settings..env.local# WorkOS AuthKit ConfigurationWORKOS_CLIENT_ID=client_your_client_id_hereWORKOS_API_KEY=sk_test_your_api_key_hereWORKOS_COOKIE_PASSWORD=your_secure_password_here_must_be_at_least_32_characters_longNEXT_PUBLIC_WORKOS_REDIRECT_URI=http://localhost:3000/callback# Convex Configuration (you don't have to fill these out, they're generated by Convex)# Deployment used by `npx convex dev`CONVEX_DEPLOY_KEY=your_convex_deploy_key_hereNEXT_PUBLIC_CONVEX_URL=https://your-convex-url.convex.cloud - Install AuthKit
In a new terminal window, install the AuthKit Next.js SDK:
npm install @workos-inc/authkit-nextjs @convex-dev/workos - Add AuthKit middleware
AuthKit's
authkitMiddleware()helper grants you access to user authentication state throughout your app.Create a
middleware.tsfile.In your
middleware.tsfile, export theauthkitMiddleware()helper:import { authkitMiddleware } from '@workos-inc/authkit-nextjs';export default authkitMiddleware({middlewareAuth: {enabled: true,unauthenticatedPaths: ['/', '/sign-in', '/sign-up'],},});export const config = {matcher: [// Skip Next.js internals and all static files, unless found in search params'/((?!_next|[^?]*\\.(?:html?|css|js(?!on)|jpe?g|webp|png|gif|svg|ttf|woff2?|ico|csv|docx?|xlsx?|zip|webmanifest)).*)',// Always run for API routes'/(api|trpc)(.*)',],}; - Add authentication routes
Create the required authentication routes for WorkOS AuthKit to handle sign-in, sign-up, and callback flows.
These routes enable the authentication flow by providing endpoints for users to sign in, sign up, and return after authentication.
Create the callback route to handle OAuth callbacks:
app/callback/route.tsimport { handleAuth } from '@workos-inc/authkit-nextjs';export const GET = handleAuth(); - Create the sign-in routeapp/sign-in/route.tsimport { redirect } from 'next/navigation';import { getSignInUrl } from '@workos-inc/authkit-nextjs';export async function GET() {const authorizationUrl = await getSignInUrl();return redirect(authorizationUrl);}
- Create the sign-up route
To redirect users to WorkOS sign-up:
app/sign-up/route.tsimport { redirect } from 'next/navigation';import { getSignUpUrl } from '@workos-inc/authkit-nextjs';export async function GET() {const authorizationUrl = await getSignUpUrl();return redirect(authorizationUrl);} - Configure ConvexProviderWithAuthKit
Your Next.js app needs to connect AuthKit authentication with Convex for real-time data. We'll create a single provider component that handles both.
Create the Provider Component
This single component handles:
- WorkOS authentication setup
- Convex client initialization
- Token management between WorkOS and Convex
- Loading states and error handling
Create
components/ConvexClientProvider.tsx:components/ConvexClientProvider.tsx'use client';import { ReactNode, useCallback, useState } from 'react';import { ConvexReactClient } from 'convex/react';import { ConvexProviderWithAuth } from 'convex/react';import { AuthKitProvider, useAuth, useAccessToken } from '@workos-inc/authkit-nextjs/components';export function ConvexClientProvider({ children }: { children: ReactNode }) {const [convex] = useState(() => {return new ConvexReactClient(process.env.NEXT_PUBLIC_CONVEX_URL!);});return (<AuthKitProvider><ConvexProviderWithAuth client={convex} useAuth={useAuthFromAuthKit}>{children}</ConvexProviderWithAuth></AuthKitProvider>);}function useAuthFromAuthKit() {const { user, loading: isLoading } = useAuth();const { getAccessToken, refresh } = useAccessToken();const isAuthenticated = !!user;const fetchAccessToken = useCallback(async ({ forceRefreshToken }: { forceRefreshToken?: boolean } = {}): Promise<string | null> => {if (!user) {return null;}try {if (forceRefreshToken) {return (await refresh()) ?? null;}return (await getAccessToken()) ?? null;} catch (error) {console.error('Failed to get access token:', error);return null;}},[user, refresh, getAccessToken],);return {isLoading,isAuthenticated,fetchAccessToken,};} - Add to your layout
Update
app/layout.tsxto use the provider:app/layout.tsximport type { Metadata } from 'next';import { Geist, Geist_Mono } from 'next/font/google';import './globals.css';import { ConvexClientProvider } from '@/components/ConvexClientProvider';const geistSans = Geist({variable: '--font-geist-sans',subsets: ['latin'],});const geistMono = Geist_Mono({variable: '--font-geist-mono',subsets: ['latin'],});export const metadata: Metadata = {title: 'Create Next App',description: 'Generated by create next app',icons: {icon: '/convex.svg',},};export default function RootLayout({children,}: Readonly<{children: React.ReactNode;}>) {return (<html lang="en"><body className={`${geistSans.variable} ${geistMono.variable} antialiased`}><ConvexClientProvider>{children}</ConvexClientProvider></body></html>);} - Show UI based on authentication state
You can control which UI is shown when the user is signed in or signed out using Convex's
<Authenticated>,<Unauthenticated>,<AuthLoading>and<AuthRefreshing>helper components.In the following example, the
<Content />component is a child of<Authenticated>, so its content and any of its child components are guaranteed to have an authenticated user, and Convex queries can require authentication.tipIf you choose to build your own auth-integrated components without using the helpers, it's important to use the
useConvexAuth()hook instead of AuthKit'suseAuth()hook when you need to check whether the user is logged in or not. TheuseConvexAuth()hook makes sure that the browser has fetched the auth token needed to make authenticated requests to your Convex backend, and that the Convex backend has validated it.app/page.tsx"use client";import { Authenticated, Unauthenticated, useQuery } from "convex/react";import { useAuth } from "@workos-inc/authkit-nextjs/components";import { api } from "../convex/_generated/api";import Link from "next/link";export default function Home() {const { user, signOut } = useAuth();return (<div className="p-4"><div className="flex justify-between items-center mb-4"><h1>Convex + AuthKit</h1><div className="flex gap-2">{user ? (<button onClick={() => signOut()}>Sign out</button>) : (<><Link href="/sign-in"><button>Sign in</button></Link><Link href="/sign-up"><button>Sign up</button></Link></>)}</div></div><Authenticated><Content /></Authenticated><Unauthenticated><p>Please sign in to view data</p></Unauthenticated></div>);}function Content() {const data = useQuery(api.myFunctions.listNumbers, { count: 10 });if (!data) return <p>Loading...</p>;return (<div><p>Welcome {data.viewer}!</p><p>Numbers: {data.numbers?.join(', ') || 'None'}</p></div>);} - Use authentication state in your Convex functions
If the client is authenticated, you can access the information stored in the JWT via
ctx.auth.getUserIdentity.If the client isn't authenticated,
ctx.auth.getUserIdentitywill returnnull.Make sure that the component calling this query is a child of
<Authenticated>fromconvex/react. Otherwise, it will throw on page load.convex/myFunctions.tsimport { v } from "convex/values";import { query } from "./_generated/server";export const listNumbers = query({args: {count: v.number(),},handler: async (ctx, args) => {const identity = await ctx.auth.getUserIdentity();if (identity === null) {throw new Error("Not authenticated");}const numbers = await ctx.db.query("numbers")// Ordered by _creationTime, return most recent.order("desc").take(args.count);return {viewer: identity.name,numbers: numbers.reverse().map((number) => number.value),};},});
Note: The Next.js template includes additional features and functions for a complete working application. This tutorial covers the core integration steps, but the template provides a more comprehensive implementation.
Example: TanStack Start with Convex and WorkOS AuthKit
This guide assumes you have AuthKit set up and have a working TanStack Start app with Convex. If not, follow the Convex TanStack Start Quickstart first. Then:
- Set up your environment variablestip
If you're using a Convex-managed WorkOS team, this was done for you in Project configuration.
In your
.env.localfile, set the following environment variables.Note:
WORKOS_CLIENT_IDandWORKOS_API_KEYcan be found in your WorkOS Dashboard.WORKOS_COOKIE_PASSWORD: A secure password used to encrypt session cookies. This must be at least 32 characters long. You can generate a random one withopenssl rand -base64 24..env.local# WorkOS AuthKit ConfigurationWORKOS_CLIENT_ID=client_your_client_id_hereWORKOS_API_KEY=sk_test_your_api_key_hereWORKOS_COOKIE_PASSWORD=your_secure_password_here_must_be_at_least_32_characters_longWORKOS_REDIRECT_URI=http://localhost:3000/callback# Convex Configuration (you don't have to fill these out, they're generated by Convex)VITE_CONVEX_URL=https://your-convex-url.convex.cloud - Install AuthKit
In a new terminal window, install the AuthKit TanStack Start SDK:
npm install @workos/authkit-tanstack-react-start - Configure Start middleware
WorkOS AuthKit requires server-side middleware to manage authentication sessions. Update your
src/start.tsto include the AuthKit middleware:src/start.tsimport { createStart } from '@tanstack/react-start';import { authkitMiddleware } from '@workos/authkit-tanstack-react-start';export const startInstance = createStart(() => {return {requestMiddleware: [authkitMiddleware()],};}); - Configure ConvexProviderWithAuth
Update your
src/router.tsxto wrap the router with<AuthKitProvider>and<ConvexProviderWithAuth>, and provide a customuseAuthFromAuthKithook that bridges WorkOS's auth state to Convex.src/router.tsximport { createRouter } from '@tanstack/react-router';import { ConvexQueryClient } from '@convex-dev/react-query';import { QueryClient } from '@tanstack/react-query';import { setupRouterSsrQueryIntegration } from '@tanstack/react-router-ssr-query';import { ConvexProviderWithAuth, ConvexReactClient } from 'convex/react';import { AuthKitProvider, useAccessToken, useAuth } from '@workos/authkit-tanstack-react-start/client';import { useCallback, useMemo } from 'react';import { routeTree } from './routeTree.gen';export function getRouter() {const CONVEX_URL = (import.meta as any).env.VITE_CONVEX_URL!;if (!CONVEX_URL) {throw new Error('missing VITE_CONVEX_URL envar');}const convex = new ConvexReactClient(CONVEX_URL);const convexQueryClient = new ConvexQueryClient(convex);const queryClient = new QueryClient({defaultOptions: {queries: {queryKeyHashFn: convexQueryClient.hashFn(),queryFn: convexQueryClient.queryFn(),gcTime: 5000,},},});convexQueryClient.connect(queryClient);const router = createRouter({routeTree,defaultPreload: 'intent',scrollRestoration: true,defaultPreloadStaleTime: 0, // Let React Query handle all cachingdefaultErrorComponent: (err) => <p>{err.error.stack}</p>,defaultNotFoundComponent: () => <p>not found</p>,context: { queryClient, convexClient: convex, convexQueryClient },Wrap: ({ children }) => (<AuthKitProvider><ConvexProviderWithAuth client={convexQueryClient.convexClient} useAuth={useAuthFromAuthKit}>{children}</ConvexProviderWithAuth></AuthKitProvider>),});setupRouterSsrQueryIntegration({ router, queryClient });return router;}function useAuthFromAuthKit() {const { loading, user } = useAuth();const { getAccessToken, refresh } = useAccessToken();const fetchAccessToken = useCallback(async ({ forceRefreshToken }: { forceRefreshToken: boolean }) => {if (!user) {return null;}if (forceRefreshToken) {return (await refresh()) ?? null;}return (await getAccessToken()) ?? null;},[user, refresh, getAccessToken],);return useMemo(() => ({isLoading: loading,isAuthenticated: !!user,fetchAccessToken,}),[loading, user, fetchAccessToken],);} - Add SSR auth in the root route
To make authenticated Convex queries work during server-side rendering, call WorkOS's
getAuth()inbeforeLoadand pass the access token to the Convex client.src/routes/__root.tsximport { HeadContent, Outlet, Scripts, createRootRouteWithContext } from '@tanstack/react-router';import { getAuth } from '@workos/authkit-tanstack-react-start';import appCssUrl from '../app.css?url';import type { QueryClient } from '@tanstack/react-query';import type { ReactNode } from 'react';import type { ConvexReactClient } from 'convex/react';import type { ConvexQueryClient } from '@convex-dev/react-query';export const Route = createRootRouteWithContext<{queryClient: QueryClient;convexClient: ConvexReactClient;convexQueryClient: ConvexQueryClient<ConvexReactClient>;}>()({head: () => ({meta: [{charSet: 'utf-8',},{name: 'viewport',content: 'width=device-width, initial-scale=1',},{title: 'Convex + TanStack Start + WorkOS AuthKit',},],links: [{ rel: 'stylesheet', href: appCssUrl },{ rel: 'icon', href: '/convex.svg' },],}),component: RootComponent,notFoundComponent: () => <div>Not Found</div>,beforeLoad: async (ctx) => {const auth = await getAuth();// During SSR only (the only time serverHttpClient exists),// set the WorkOS auth token to make HTTP queries with.if (auth.user) {ctx.context.convexQueryClient.serverHttpClient?.setAuth(auth.accessToken);}return { user: auth.user };},});function RootComponent() {return (<RootDocument><Outlet /></RootDocument>);}function RootDocument({ children }: Readonly<{ children: ReactNode }>) {return (<html lang="en"><head><HeadContent /></head><body>{children}<Scripts /></body></html>);} - Add callback route
Unlike the React SPA integration, TanStack Start uses server-side authentication which requires an explicit callback route to handle the OAuth redirect from WorkOS.
src/routes/callback.tsximport { createFileRoute } from '@tanstack/react-router';import { handleCallbackRoute } from '@workos/authkit-tanstack-react-start';export const Route = createFileRoute('/callback')({server: {handlers: {GET: handleCallbackRoute(),},},}); - Add sign-in and sign-up redirect routes
Create dedicated server routes that call
getSignInUrl()/getSignUpUrl()and redirect. Link to these routes from your UI.src/routes/sign-in.tsximport { createFileRoute } from '@tanstack/react-router';import { getSignInUrl } from '@workos/authkit-tanstack-react-start';export const Route = createFileRoute('/sign-in')({server: {handlers: {GET: async ({ request }: { request: Request }) => {const returnPathname = new URL(request.url).searchParams.get('returnPathname');const url = await getSignInUrl(returnPathname ? { data: { returnPathname } } : undefined);return new Response(null, {status: 307,headers: { Location: url },});},},},});src/routes/sign-up.tsximport { createFileRoute } from '@tanstack/react-router';import { getSignUpUrl } from '@workos/authkit-tanstack-react-start';export const Route = createFileRoute('/sign-up')({server: {handlers: {GET: async ({ request }: { request: Request }) => {const returnPathname = new URL(request.url).searchParams.get('returnPathname');const url = await getSignUpUrl(returnPathname ? { data: { returnPathname } } : undefined);return new Response(null, {status: 307,headers: { Location: url },});},},},}); - Show UI based on authentication state
You can control which UI is shown when the user is signed in or signed out using Convex's
<Authenticated>,<Unauthenticated>,<AuthLoading>and<AuthRefreshing>helper components.In TanStack Start, you can use WorkOS's server-side
getAuth()in a route loader to get the user before the page renders.tipIf you choose to build your own auth-integrated components without using the helpers, it's important to use the
useConvexAuth()hook instead of AuthKit'suseAuth()hook when you need to check whether the user is logged in or not. TheuseConvexAuth()hook makes sure that the browser has fetched the auth token needed to make authenticated requests to your Convex backend, and that the Convex backend has validated it.src/routes/index.tsximport { createFileRoute } from '@tanstack/react-router';import { Authenticated, Unauthenticated } from 'convex/react';import { useAuth } from '@workos/authkit-tanstack-react-start/client';import { getAuth } from '@workos/authkit-tanstack-react-start';import { convexQuery } from '@convex-dev/react-query';import { useSuspenseQuery } from '@tanstack/react-query';import { api } from '../../convex/_generated/api';export const Route = createFileRoute('/')({component: Home,loader: async () => {const { user } = await getAuth();return { user };},});function Home() {const { user } = Route.useLoaderData();const { signOut } = useAuth();return (<div className="p-4"><div className="flex justify-between items-center mb-4"><h1>Convex + TanStack Start + WorkOS</h1>{user ? (<button onClick={() => signOut()}>Sign out</button>) : (<div className="flex gap-2"><a href="/sign-in"><button>Sign in</button></a><a href="/sign-up"><button>Sign up</button></a></div>)}</div><Authenticated><Content /></Authenticated><Unauthenticated><p>Please sign in to view data</p></Unauthenticated></div>);}function Content() {const { data } = useSuspenseQuery(convexQuery(api.myFunctions.listNumbers, { count: 10 }),);return (<div><p>Welcome {data.viewer}!</p><p>Numbers: {data.numbers?.join(', ') || 'None'}</p></div>);} - Use authentication state in your Convex functions
If the client is authenticated, you can access the information stored in the JWT via
ctx.auth.getUserIdentity.If the client isn't authenticated,
ctx.auth.getUserIdentitywill returnnull.Make sure that the component calling this query is a child of
<Authenticated>fromconvex/react. Otherwise, it will throw on page load.convex/myFunctions.tsimport { v } from "convex/values";import { query } from "./_generated/server";export const listNumbers = query({args: {count: v.number(),},handler: async (ctx, args) => {const identity = await ctx.auth.getUserIdentity();if (identity === null) {throw new Error("Not authenticated");}const numbers = await ctx.db.query("numbers")// Ordered by _creationTime, return most recent.order("desc").take(args.count);return {viewer: identity.name,numbers: numbers.reverse().map((number) => number.value),};},});
Note: The TanStack Start template includes additional features and functions for a complete working application. This tutorial covers the core integration steps, but the template provides a more comprehensive implementation.
Next steps
Now that your app is up and running on Convex and AutKit, refer to the main docs to learn about additional functionality.