Convex & WorkOS AuthKit
WorkOS AuthKit is an authentication solution that enables sign-in using passwords, social login providers, email one-time codes, two-factor authentication, and user management capabilities.
You can use your own WorkOS account with AuthKit or let Convex create a managed WorkOS team which enables provisioning and configuration of AuthKit environments automatically.
The docs below are targeted at starting a new project with WorkOS AuthKit and Convex. If you have an existing app that you'd like to migrate, see the Add to Existing App instructions instead.
Get started
Use the following command to start a new project. It will prompt you to select a framework and authentication option. Choose whichever framework you want and AuthKit as your authentication option:
npm create convex@latest
Start your newly created application in dev mode:
cd my-app  # or whatever you name the directory
npm run dev
That will kick off a Convex+WorkOS onboarding flow. For guidance on how to proceed, follow the instructions in one of the sections below.
Option 1: use a Convex-managed WorkOS team
Choose this option if you're new to WorkOS or if you want the convenience of the auto-provisioning and auto-configuration that the full integration offers.
Permissions: provisioning the Convex-managed WorkOS team, disconnecting it, inviting WorkOS team members, and creating/deleting shared project-level WorkOS environments all require team admin (or project admin, for the project-level operations). Provisioning a WorkOS environment for an individual deployment uses the same permission as managing that deployment, so any team member can self-serve a WorkOS env for their dev/preview deployment but only admins can do so for production.
Follow the prompts to create a WorkOS team that will be associated with your Convex team. After this, team members of this Convex team can self-serve WorkOS environments for their dev/preview deployments, and team admins can provision shared project-level environments and production envs.
See what additional functionality is available in Next steps and see AuthKit configuration in convex.json to modify the convex.json file in this template for your needs.
What if I already have a WorkOS team but want to use the Convex-managed features?
If you you are an existing WorkOS user but want the Convex auto-configuration
and auto-provisioning support, you'll need to start with a new WorkOS team
that is managed by Convex. To do that, make sure you select an email address
that isn't already associated with a WorkOS team when prompted. The email
address will need to be linked with your Convex account. You can
link additional email addresses to your
Convex account in the dashboard. Depending on your email provider, you might be
able to use a + address for this step (e.g. your.name+workos@example.com) to
avoid having to create an entirely new email account.
If using an existing WorkOS team is more important than the
auto-provisioning and auto-configuration support, you should exit out of the
prompt flow triggered by npm run dev and follow along with
the section below instead. Just note that using an existing
team means that Convex won't be able to auto-configure new applications or
auto-provision WorkOS environments for each of your deployments.
Option 2: use an existing WorkOS team
Choose this option if you're an established WorkOS AuthKit user and using your existing WorkOS team is more important than the auto-provisioning and auto-configuration that the full integration offers.
When you are prompted to create a new WorkOS team, choose No.
You'll then need to manually configure your Convex deployment and client framework.
- Find your WorkOS Client ID and API Key
From the WorkOS dashboard get started page under Quick start, find your
WORKOS_CLIENT_IDandWORKOS_API_KEY.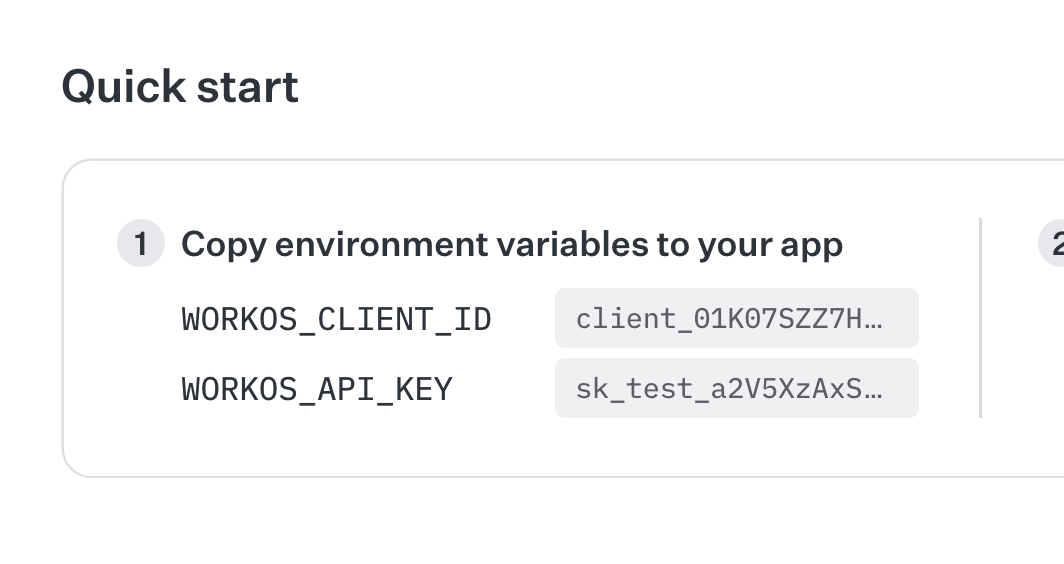
- Set the values in your deployment
Use the
npx convexCLI to set environment variables forWORKOS_CLIENT_IDandWORKOS_API_KEYwith values from the WorkOS dashboard in the previous step.npx convex env set WORKOS_CLIENT_ID $YOUR_CLIENT_ID_HEREnpx convex env set WORKOS_API_KEY $YOUR_API_KEY_HERE - Deploy your application
Run
npx convex devto automatically sync your configuration to your backend.npx convex dev
For multiple Convex applications integrated with an existing WorkOS team you'll need to decide if the single-tenant or multi-tenant model is right for your situation. That may include manually provisioning additional WorkOS environments.
Next steps
Syncing data and handling events using the WorkOS Component
You can integrate the WorkOS Component into your application to sync user data into your application and handle other events (like account lifecycle) from WorkOS.
Accessing user information in functions
See Auth in Functions to learn about how to access information about the authenticated user in your queries, mutations and actions.
See Storing Users in the Convex Database to learn about how to store user information in the Convex database.
Accessing user information client-side
To access the authenticated user's information, use AuthKit's User object,
which can be accessed using AuthKit's
useAuth()
hook. For more information on the User object, see the
WorkOS docs.
export default function Badge() {
  const { user } = useAuth();

  return <span>Logged in as {user.firstName}</span>;
}
Configuring dev and prod instances
To configure a different AuthKit instance between your Convex development and
production deployments, you can use environment variables configured on the
Convex dashboard and referenced in convex/auth.config.ts.
As long as you started from npm create convex or the instructions for
adding AuthKit to an existing Convex app, your
convex/auth.config.ts file will make use of the WORKOS_CLIENT_ID value
referenced below.
Sample auth.config.ts
const clientId = process.env.WORKOS_CLIENT_ID;

const authConfig = {
  providers: [
    {
      type: "customJwt",
      issuer: `https://api.workos.com/`,
      algorithm: "RS256",
      jwks: `https://api.workos.com/sso/jwks/${clientId}`,
      applicationID: clientId,
    },
    {
      type: "customJwt",
      issuer: `https://api.workos.com/user_management/${clientId}`,
      algorithm: "RS256",
      jwks: `https://api.workos.com/sso/jwks/${clientId}`,
    },
  ],
};

export default authConfig;
Development configuration
In the left sidenav of the Convex dashboard,
switch to your development deployment and set the WORKOS_CLIENT_ID environment
variable to your development WorkOS Client ID.
Then, to switch your deployment to the new configuration, run npx convex dev.
Production configuration
In the left sidenav of the Convex dashboard,
switch to your production deployment and set the WORKOS_CLIENT_ID environment
variable to your production WorkOS Client ID.
Then, to switch your deployment to the new configuration, run
npx convex deploy.
Configuring WorkOS AuthKit's API keys
WorkOS AuthKit's API keys differ depending on whether they are for development
or production. Don't forget to update the environment variables in your .env
file as well as your hosting platform, such as Vercel or Netlify.
Development configuration
WorkOS API Key for development follows the format sk_test_.... WorkOS Client
ID for development follows the format client_01....
WORKOS_CLIENT_ID="client_01XXXXXXXXXXXXXXXXXXXXXXXX"
WORKOS_API_KEY="sk_test_..."
WORKOS_COOKIE_PASSWORD="your_secure_password_here_must_be_at_least_32_characters_long"
NEXT_PUBLIC_WORKOS_REDIRECT_URI="http://localhost:3000/callback"
Production configuration
WorkOS API Key for production follows the format sk_live_.... WorkOS Client ID
for production follows the format client_01....
WORKOS_CLIENT_ID="client_01XXXXXXXXXXXXXXXXXXXXXXXX"
WORKOS_API_KEY="sk_live_..."
WORKOS_COOKIE_PASSWORD="your_secure_password_here_must_be_at_least_32_characters_long"
NEXT_PUBLIC_WORKOS_REDIRECT_URI="https://your-domain.com/callback"
Under the hood
The authentication flow looks like this under the hood:
- The user clicks a login button
- The user is redirected to a page where they log in via whatever method you configure in AuthKit
- After a successful login AuthKit redirects back to your page, or a
different page which you configure via the
redirectUriprop. - The
AuthKitProvidernow knows that the user is authenticated. - The
ConvexProviderWithAuthKitfetches an auth token from AuthKit. - The
ConvexReactClientpasses this token down to your Convex backend to validate - Your Convex backend retrieves the public key from AuthKit to check that the token's signature is valid.
- The
ConvexReactClientis notified of successful authentication, andConvexProviderWithAuthKitnow knows that the user is authenticated with Convex.useConvexAuthreturnsisAuthenticated: trueand theAuthenticatedcomponent renders its children.
ConvexProviderWithAuthKit takes care of refetching the token when needed to
make sure the user stays authenticated with your backend.